Quantcast
Channel: templatic – Templatic.com Documentation
Viewing all 53 articles
Browse latest View live

Allow users to submit blog posts on your Directory theme

$
0
0

Writing regular blog posts can be a huge boost for your Directory website as more content will drive more traffic on your website.

But if you are caught up with a lot of things to do and can’t find time to write the blog posts, you can allow guest authors to submit blog posts on your website. They can even submit their blog post from frontend like they submit listing.

Here’s how you can enable Submit Post page on your DIrectory website:

  • To begin, login to your site admin panel and go to Pages >> Add New and give title to the page and insert [submit_form post_type=post] shortcode in the description area of the page.
  • After creating a submission page, you can enable custom fields for the submit blog page by inserting new or editing the existing fields from WP-admin >> Tevolution >> Custom Fields >> Edit. Here, select the post type and post categories and save all changes.

This way you can enable Submit blog posts page for your visitors on your website, you can always moderate the blog posts before publishing them too.


How to localize Google Map in Directory theme

$
0
0

Google maps are backbone of our Directory themes, What if you can have the map in your own language on the Directory theme? Nice no? Yes, you can translate the Google Map language in your Directory theme or any other theme using Google Maps.

Let’s see how can we achieve this:

  • Open the relative file of MAP from where the map parameters like zooming factor and all are given. You will be able to find a line of code something like this:
  • <script type=”text/javascript” src=”http://maps.googleapis.com/maps/api/js?sensor=false”></script>
  • If you are not able to find the whole line, just try to look for the “src” URL. Replace it with this one:
  • <script type=”text/javascript” src=”http://maps.googleapis.com/maps/api/js?sensor=false&language=es”></script>
  • As you can see that it has only added “&language=es” in to the URL end. es is the language code. You can have a list of available languages and their codes here.
  • There can be some more text after “sensor=false” in your file. At the end of the src just append the language parameter with “&” sign(&language=es).

Google developers are providing more detailed information here – https://developers.google.com/maps/documentation/javascript/basics#Language

Should you have any suggestions/ questions, do let me know here.

The post How to localize Google Map in Directory theme appeared first on Templatic.com Documentation.

My Directory site is showing a blank page or Internal server error frequently

$
0
0

We’ve had a customers in general have an issue where their site is showing a blank page or 500 Internal server error frequently. All of them were using GoDaddy server.

We generally recommend users to use Site5 hosting to run the template without having such an issue(s) as Directory is an application like theme so it is natural that it will require more server resources then other simple WordPress themes and as soon as your site gets traction both content and traffic on your website will increase simultaneously so your website will need more server resources for better performance.

If you are on a shared hosting your server resources will be shared with other websites on the same server so you will get limited resources for your website which will ultimately result in an underperforming website. On the other hand if you go with a dedicated server all server resources will be available for your website and it will perform much better.

However, if you would like to go with GoDaddy server, here is a list of some solutions which you should try to resolve the issue:

Solution – 1:

First of all, check the PHP version you are using. It should be 5.5 or greater.

You can refer to this link for how to update the PHP version:

https://www.godaddy.com/help/view-or-change-your-php-version-3937

Solution – 2:

Check your site’s error log. You can ask your web host for the error log. If you are getting the error mentioned below in your error log, then follow these steps:

Error: Connection reset by peer: mod_fcgid: error reading data from FastCGI server

Steps:

  • Go to /home/sitename/fcgi-bin
  • Use this command to reset the immutable flag: chattr -i php5.fcgi
  • Then delete the /home/sitename/etc and /home/sitename/fcgi-bin directories (making sure that anything that’s not PHP related in etc is saved)
  • Using virtualmin switch back to apache mod_php mode and then back to FCGId mode. The site should now work. Don’t forget to chow any files/directories in public_html that were apache to : Note that these are both usually the sitename.

If you guys are not aware about the steps mentioned above, then consult with your web host regarding this as they would be better able to help you resolve this matter.

The post My Directory site is showing a blank page or Internal server error frequently appeared first on Templatic.com Documentation.

Securing your WordPress Directory website

$
0
0

Security in WordPress is taken very seriously, but as with any other system there are potential security issues that may arise if some basic security precautions aren’t taken.

This article will go through some common forms of vulnerabilities, and the things you can do to help keep your WordPress installation secure.

This article is not the ultimate quick fix to your security concerns. If you have specific security concerns or doubts, you should discuss them with people whom you trust to have sufficient knowledge of computer security and WordPress.

Fundamentally, security is not about perfectly secure systems. Such a thing might well be impractical, or impossible to find and/or maintain. A secure server protects the privacy, integrity, and availability of the resources under the server administrator’s control.

Decide which security you need on your server by determining the software and data that needs to be secured. The rest of this guide will help you with this.

Updating WordPress

Main article: Updating WordPress.

The latest version of WordPress is always available from the main WordPress website at https://wordpress.org. Official releases are not available from other sites — never download or install WordPress from any website other than https://wordpress.org.

Since version 3.7, WordPress has featured automatic updates. Use this functionality to ease the process of keeping up to date. You can also use the WordPress Dashboard to keep informed about updates. Read the entry in the Dashboard or the WordPress Developer Blog to determine what steps you must take to update and remain secure.

If a vulnerability is discovered in WordPress and a new version is released to address the issue, the information required to exploit the vulnerability is almost certainly in the public domain. This makes old versions more open to attack, and is one of the primary reasons you should always keep WordPress up to date.

If you are an administrator in charge of more than one WordPress installation, consider using Subversion to make management easier.

How To rename WordPress wp-content directory

To successfully rename the wp-content directory and still have a fully functional website, you need to follow the below steps carefully. Do not miss any of the steps.

  • Open the WordPress folder and rename the wp-content folder to “content“( I chose to rename it as content, you can choose any name you want).

Note: After renaming this folder, any activated plugin or theme will be deactivated and will not be listed in their respective pages, since WordPress cannot find them from the default location, wp-content.

  • Open the wp-config.php file located at root folder of the WordPress and find below line of code which resides normally at the end of the file:require_once(ABSPATH . ‘wp-settings.php’);
  • Above this, add below section of code:

define (‘WP_CONTENT_FOLDERNAME’, ‘content‘);

define (‘WP_CONTENT_DIR’, ABSPATH . WP_CONTENT_FOLDERNAME) ;

define (‘WP_CONTENT_URL’, ‘http://siteurl.com/’.WP_CONTENT_FOLDERNAME);

define (‘WP_PLUGIN_DIR’, WP_CONTENT_DIR . ‘/plugins’);

define (‘WP_PLUGIN_URL’, WP_CONTENT_URL.’/plugins’);

How to change the URL of WordPress Login screen

Many hacking scripts are written specifically to look for “wp-login.php” or “/wp-admin”. So renaming them will harden the website for sure.

  • You can rename the wp-login.php or wp-admin slug using the third party plugin named “Rename wp-login.php (unmaintained)“.
  • After activating plugin, go to wp-admin >> Settings >> Permalinks >> Rename wp-login.php >> Login URL. Insert “tech“(you can give any name you want) and save.
  • Now, your WordPress login screen URL is: http://siteurl.com/tech

Plugins

First of all, make sure your plugins are always updated. Also, if you are not using a specific plugin, delete it from the system.

File Permissions

Some neat features of WordPress come from allowing various files to be writable by the web server. However, allowing write access to your files is potentially dangerous, particularly in a shared hosting environment.

It is best to lock down your file permissions as much as possible and to loosen those restrictions on the occasions that you need to allow write access, or to create specific folders with less restrictions for the purpose of doing things like uploading files.

Disable File Editing

The WordPress Dashboard by default allows administrators to edit PHP files, such as plugin and theme files. This is often the first tool an attacker will use if able to login, since it allows code execution.

WordPress has a constant to disable editing from Dashboard. Placing this line in wp-config.php is equivalent to removing the ‘edit_themes’, ‘edit_plugins’ and ‘edit_files’ capabilities of all users:

define(‘DISALLOW_FILE_EDIT’, true);

The post Securing your WordPress Directory website appeared first on Templatic.com Documentation.

Some of the common doubts you might face while configuring your site using Directory theme

$
0
0

1. What if you are not seeing some of the taxonomy options at your menu settings column shown at the left sidebar panel.

While configuring a WordPress custom menu using wp-admin >> Appearance >> Menus section and in case if the system is not populating some of the additional taxonomy options, make sure that you have already checked those meta boxes from the screen option shown at the top left.

2. What is your front end submission form is not populating certain custom fields.

If you are come up with any issue with submission form, All we have to check the settings of Tevolution custom fields because submission form is entirely associated with the custom field module.

If you are not seeing any custom fields over the submission form, Go through your wp-admin >> Tevolution >> Custom fields >> Edit those individual custom field which are currently not populating over the front end,  Now From the “Display Options” make sure that you have already checked the option that says ” Submission form (field will show on editing screen regardless) “.

Make sure that you have already selected appropriate post types and their respective categories from those custom fields’ settings.

Also if you have activated a plugin called “Tevolution-FieldsMonetization” along with the existing directory configuration, Go through your wp-admin >> Tevolution >> Monetization >> Edit those existing price packages >> Make sure that you have selected those custom fields and categories.

3. If we need to increase number of posts to be shown on individual category pages.

With the initial directory setup, Category pages are populating only 5 posts, If you wish to increase this numbers, Go through your wp-admin >> Settings >> Reading settings >> Input the value for the field that says “Blog pages show at most” field.

4. What if the home page multicity map widget is not populating any post type and categories.

Sometimes if we are not seeing any categories and post type over the home page map, Go to the wp-admin >> Tevolution >> Manage Locations >> Cities tab >> Edit your existing cities and make sure that you have already selected those post types and their respective categories.

And for the single city map, you can check those cities and post types from the widget “T → Homepage Map – Single city” placed at any of your active widget area.

5. What if your imported cities are not populating at the header city selector region.

If We have successfully imported some of the cities using the bulk import/export plugin but those cities are not populating at header city selector or T->City Dropdown widget, then we have to assign certain listing/event post to those existing cities.  if those cities are empty or we can say if they are not holding any posts, then they will not be populate over the front end.

6. What if you are not seeing Multy city custom field for the submission page of any post type.

First of all,  Please go through your wp-admin >> Tevolution >> Custom fields >> Edit one of your existing custom field named as “Multi City” (holding an html variable name as post_city_id) and make sure that the custom field is already active and you have checked those post type along with their associated categories.

Now go to your wp-admin >> Tevolution >> Manage Locations >> Check that post type for the option “Activate location management for”

That’s all for today and i hope you will like the topics.

The post Some of the common doubts you might face while configuring your site using Directory theme appeared first on Templatic.com Documentation.

Some useful tricks for developer for debugging

$
0
0

How we can find complete file path for the required page?

This can be useful for any WordPress based theme. if you need to amend certain code for a specific module/page and if you are unable to locate correct file,  you can try performing a below steps.

  • Open one of the WordPress files named as template-loader.php placed at “wp-includes” folder.
  • At a very end of the file contents, You will find the code as:
if ( $template = apply_filters( 'template_include', $template ) )
include( $template );
return;
endif;

Replace it with the below code:

if ( $template = apply_filters( 'template_include', $template ) ){
echo $template;
include( $template );
return;
}
endif;
  • Save the file and refresh the front page
  • At top of the page, you will get a complete file path which is used as a main template for the related page

How to find database table prefix for a WordPress multisite.

If you have configured multiple sites using a WordPress multisite network and if we face any sort of trouble finding a correct prefix for any site, follow the below mentioned steps.

  • Open the functions.php file located at your theme’s root folder. (functions.php file of the site for which you need to amend the database table contents)
  • Just after the opening PHP tag i.e <?php insert the code as echo $wpdb->prefix; and refresh your sites home page, you will get the associated prefix at the top.

Also, check the video link at: https://drive.google.com/file/d/0B4zqYzsurbeFa2FQdXpQb0cwQmM/view?usp=sharing

The post Some useful tricks for developer for debugging appeared first on Templatic.com Documentation.

Why the Events i have added are not appearing in front-end?

$
0
0

Events you have added does not appear on the website due to one of the following reasons:

  1. Also make sure that you have not changed option values for that particular custom field. we need to keep values as “Regular event, Recurring event“. You can edit values for option title field instead.
  2. First of all, Go to Your wp-admin >> Tevolution >>  Custom fields >> Click over the event post type tab >> Make sure that you have already enabled one of the default mandatory custom field named as “Consider this event as” (Holding an html variable named as event_type )
  3. Also make sure that below listed custom fields are already active and visible at both font end/back end.
  • Event start date,
  • Event End date,
  • Start time,
  • End time. 
  1. Along with this, if you are getting the pid=0 upon successful submission, make sure that you have already enabled custom fields Post Title, Post Category, Post Content, Post images from the same Custom Fields module.

The post Why the Events i have added are not appearing in front-end? appeared first on Templatic.com Documentation.

Troubleshooting steps if you are unable to upload images during the submission process

$
0
0

This is one of the most common problem for which we are receiving many support queries since the initial release of Directory.

If you are facing any relevant issue with the image upload process, here are few troubleshooting tips you can consider before asking for support.

1. First of all, Go to your Wp-admin >> Settings >> Submission Page >> Specify appropriate image size in kilobyte for the field that says “Maximum image upload size

2. Now connect your ftp (https://templatic.com/docs/how-to-upload-and-edit-files-on-your-server-ftp-tutorial/) and go through the folder wp-content\themes\Directory\images\ and make sure that one of the sub-folder is already exist with the name as tmp  (the directory should look look like wp-content\themes\Directory\images\tmp )

3. In case if the system has not auto-generated that folder during the directory activation process, try adding that folder manually with the same name and assign writable permission as 777 to it.

4. If the issue still persists, Try deactivating all your third party non templatic installed plugins.

I hope this will certainly gonna help you to resolve similar issues with the upload process.

The post Troubleshooting steps if you are unable to upload images during the submission process appeared first on Templatic.com Documentation.


What If we want to keep country selection instead of city

$
0
0

Many times we are receiving support queries in which some of the directory users needed to configure country Based directory site instead of cities.

There is no direct way to do this but we have a workaround for this which works quite well, Follow these steps to achieve this:

1) First of all, Go through your Wp-admin >> Tevolution >> Manage Locations >> Set City selector levels as “Only Cities

2) Now go through the cities tab, While editing or inserting the cities, Choose your required country from the first drop-down, select any random state and keep the same as of your selected country for the city name field.

3) Save all the changes.

4) Now you can change the naming directly from the .po/.mo file placed at your themes/Directory/languages folder.  (depends upon which directory product you are using right now, if you have activated any child theme then you have to translate .po/.mo file contents from the themes/directorychildtheme name/languages folder.  )

Replace the term “city” entirely with the “country” from .po/.mo file.

For example the string initially reads select your nearest city, we have to replace it with “Select Your nearest country

Do the same for all the rest of the strings too.

5)  After doing all the settings, you should also need to assign few listings under those countries in order to populate them over the front end city selector region.

The post What If we want to keep country selection instead of city appeared first on Templatic.com Documentation.

Tevolution ImportFBEvents

$
0
0

Objective

This plugin will help you simply import Facebook events into your directory events. You can import public, published facebook events to your directory site in single click. Here I am going to show you this amazing plugin is configured and get you started with it.

1. To import events from a very commonly and often used social media i.e., Facebook.com which has been used globally to list many Events around the world. This so called plugin will allow you to fetch / Filter events from Facebook.com according to their Occurrence, City, Scheduling, and even by inserting their Id’s.

2. This Plugin is to facilitate the directory site owner to import events in bulk which will drastically reduce hours and days of time of manually adding the same events.

Advantages:

      1. Save hours and Days – Time Saviour

      2. Save manual hassle and human errors

      3. Bulk import facility.

Installation

  1. Download the plugin from Templatic member area. You’ll find it inside the “My Plugins” sub-section.
  2. Navigate to WP-admin ⇨ Plugins ⇨ Add New ⇨ Use the “Browse” button to load the previously downloaded .zip file. Click on “Install Now” to confirm.
  3. Once the plugin is finished installing, click on the “Activate” button in Plugin section of your Admin Panel.

Compatibility:

This Plugin “Tevolution ImportFBEvents” is very much compatible to be used with  Directory Platform based Plugin i.e., “Tevolution – Events“.

How to initialize

As soon as the plugin gets activated, page will be re-directed to “Tevolution -> Settings -> Facebook Event Settings” where it is required to establish a connection of your site with Facebook.com by fulfilling the fields below like:

Facebook App ID,  Facebook App Secret ID and Facebook Client Access Token under Configuration tab.

Configuring will help you integrate / establish connection with Facebook.

Settings ‹ fb — WordPress 2016-01-13 12-16-55

It is very much required to get the above three ids which are considered mandatory requirements.

How to create Facebook App id and App secret Id?

Follow the steps listed below:

1) For creating facebook app id, facebook developer account has to be created first.

2) Go to manage app section. Click on “add new app”

fbe1

3) Click on “website”

fbe2

4) Skip and create app id

5) Your app id name: Say “Testing app create”

Category: App for pages

Click on create app id button.


6) Page will be redirected to the app page. Click on show button to see your app id and app secret key.

fbe4

7) Click on settings button on left side, insert “Contact Email” and click on “add platform button”

provide Site url as “http://www.xyz.com”

Click on save changes button.

fbe5

8) Left side menu click on “status & Review”

Do you want to make this app and all its live features available to the general public? = Enable

fbe6

This makes your app ready:

App Name: Testing app create

App id: 1093242364028446

App Secret Id: 3df05fb77285d94bfb04f26ff8ff56c3

Page id: 1093242364028446

fbe7


How to create client access token?

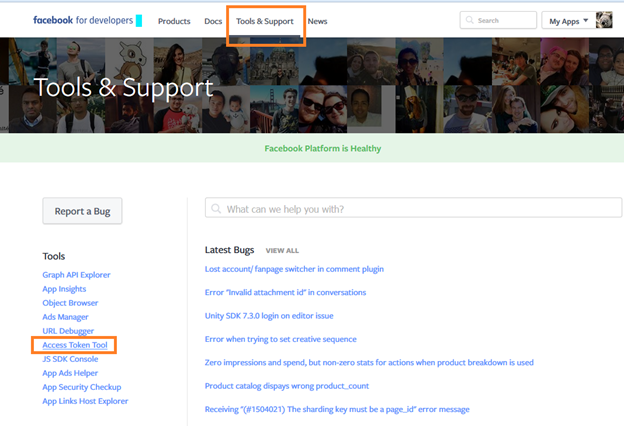
Go to “https://developers.facebook.com”

Click on “Tools & Support” link on menu.

Left side menu click on “Access Token Tool” link.

fbe8

Find your app id name, here my app name is: Testing app create

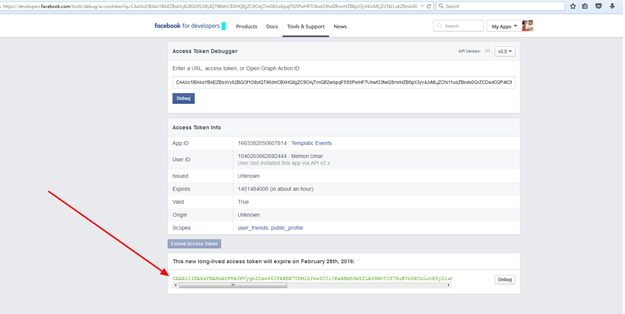
Click on Debug button. Now page is getting redirect to another page. If you are  creating access token for the first time then it will be formatting you for the need to grant permissions to your app to get an access token, once you click on it u will prompted with the user access token, You need to extend the user access token by clicking on the dubug button, there you can find the extended access token button.

fbe9


Click on “Extend Access Token” button. One pop up window will be shown. Enter your Facebook password and click submit button.

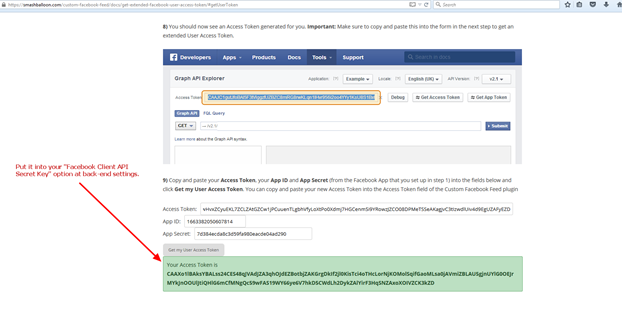
You will see a code. Copy that code and now go to “Tevolution -> Settings -> Facebook Event Settings” Click on this link Get User Access Token by providing the api, secret key and user access token

Go to the 9th step and paste your Access Token code, insert your app id and secret key. Click on Get my user access token button. You will get your access token code.

fbe10


Copy that code and paste it over “Tevolution -> Settings -> Facebook Event Settings”

Facebook Client Access token: *******************************************

Reminder: Please keep a note that Client access token is Valid only for 2 succeeding months and will be required to renew the same every after 2 months

How it works?

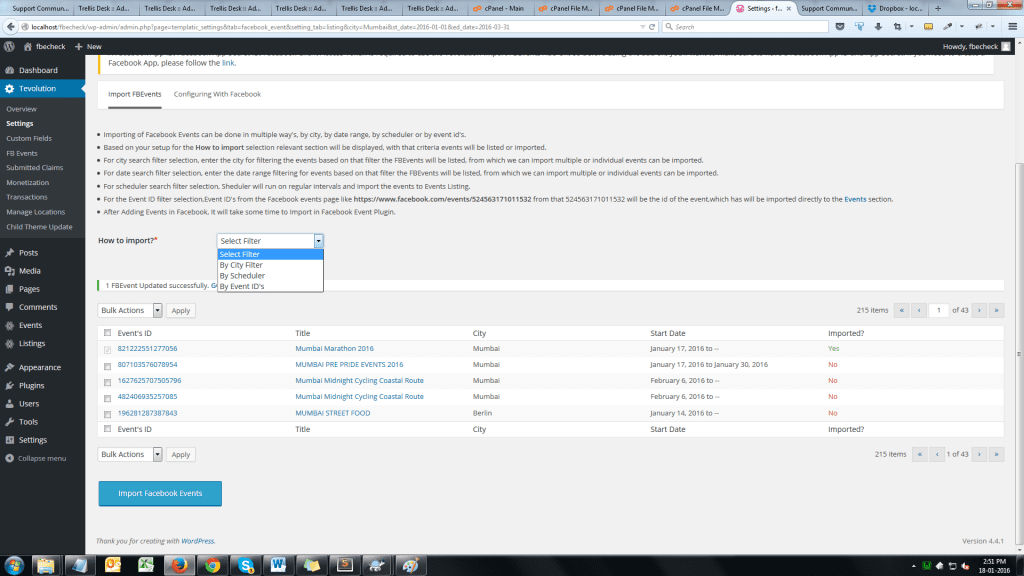
There lies 3 filters in order to fetch Events. Please take all in account as follows:

fbe14


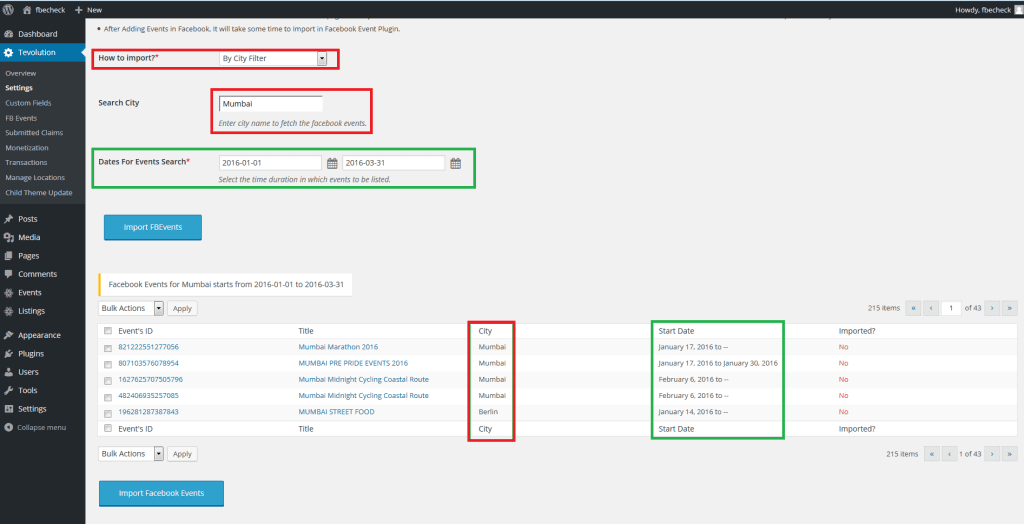
  1. By City Filter: This will help you Fetch / Search Events for that particular city which is desired to be searched in. As soon as the city filter is selected, there will include an additional filter for Date which will work in conjunction with city filter.

fbe13

2.  By Scheduler Filter: This will help you locate events which are based on time period and are going to be active after the selected schedule. Scheduler will include Hourly,          Daily, Weekly and so on.

Example: If “Daily” is selected then, Scheduler filter will help you fetch the events which will be active after 24 hours time period.


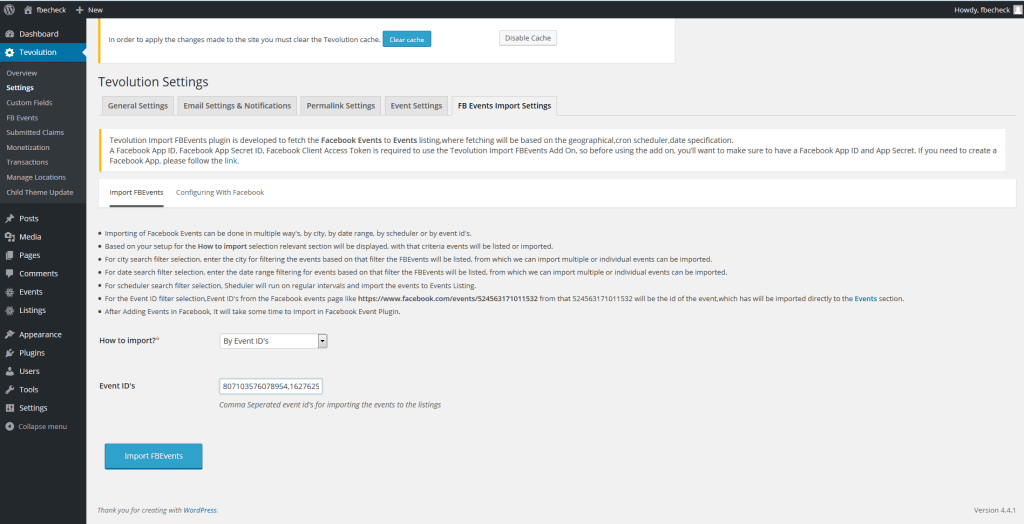
3.  By Events Id’s: This plays an important role as well. This will help you import a particular event whose Id is known to you. This can be used to import more than 1 event at a time by adding many events id’s separated by comma.

Example : 785458964162123,841264752147415,895214785214625

fbe15

Note: The events fetched using Event Id’s are automatically added in the event section of your admin panel.

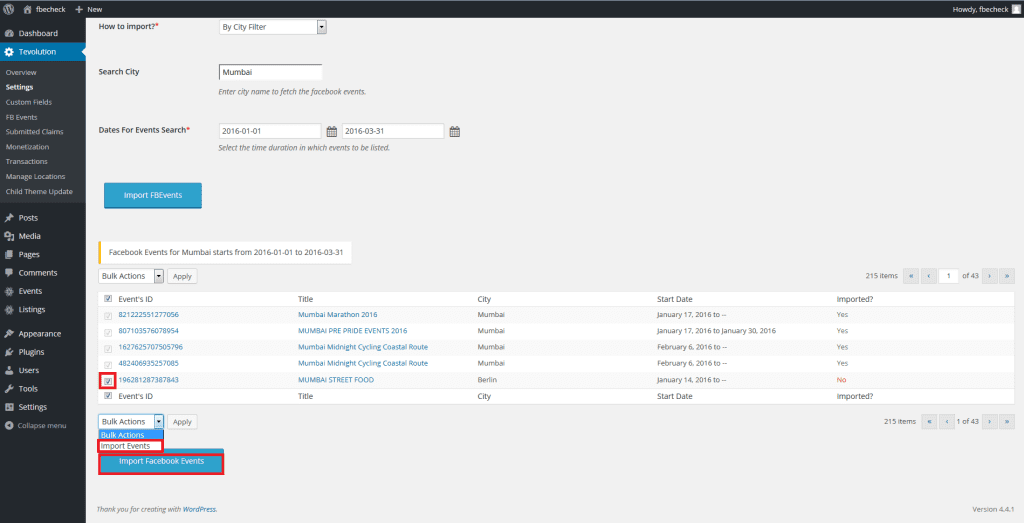
=>> After fetching / searching for the events using particular filter say by City filter, please enable the check-box of the events you desire to import and then, please click on Bulk action to get the drop down. In there, select import events and then click Import facebook event button in blue.

Please refer the captured screenshot to understand it well:

fbe16

A clause: Please make a note that facebook events will be filtered only after 24 hours of their creation.

Once the events are fetched using one of the above filters, the next step will allow you import the events those you are in need.

All you will be required to do is enable the check-boxes for the one need to be imported and then click on Import.

Proceed to the Event section of your Admin Panel and there you will find all the events of facebook whichever you desired to import.


The post Tevolution ImportFBEvents appeared first on Templatic.com Documentation.
LiveMagazine

$
0
0

Theme Installation

Installing LiveMagazine Theme using the WordPress dashboard

  1. Login to your member area, (use forgot password button if you don’t remember your password), Click on “My Downloads” and the LiveMagazine theme section will expand. Here you can download the LiveMagazine.zip file.
  2. From your wp-admin, navigate to Appearance ⇨ Themes ⇨ Add New ⇨ Upload ⇨ and load the .zip file you just downloaded.
  3. Once the upload is finished click on Install and “Activate” on next step. With that done click on the blue Install sample data button.

Installing with FTP

Installing via FTP is necessary on servers that aren’t optimized for WordPress and can often interrupt the installation process because of the long execution time. Good news is that this type of install isn’t particularly hard, just longer compared to installing from the wp-admin back-end.

For general instructions about using FTP please open this tutorial.

  • Connect to the member area and download the LiveMagazine.zip file.
  • Extract the file using software like 7-Zip. Use the Extract Here option.
  • Assuming you read the above linked FTP tutorial, navigate to /wp-content/themes/ on your server and upload the extracted theme folder
  • Login to your WordPress dashboard and go to Appearance ⇨ Themes. Activate the LiveMagazine theme.
  • While in the Appearance ⇨ Themes section, click on the blue “Install sample data” button to populate your site with dummy data and make it look like our demo.


Manage LiveMagazine Theme

The homepage

To make your homepage look just like the one inside the image below make sure you load the theme’s sample data. You can do that from Appearance ⇨ Themes ⇨ Install sample data (button). If that doesn’t help you might have to tweak a WordPress setting. Click here for more details.
LiveMagazine-home

1 – The logo section

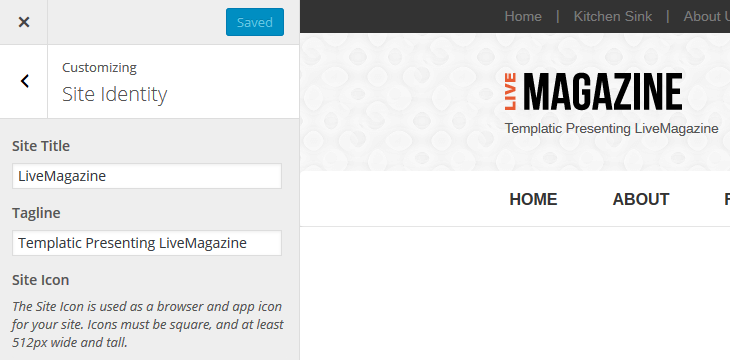
To change your logo go to Appearance ⇨ Customize ⇨ Site Logo ⇨ Upload image for logo. Default logo image size is 196×48 pixels. Try to make your logo roughly the same size.

To display your websites tagline below the logo expand the “Site Title & Tagline” section and check the “Display Tagline” option.

Logo & Tagline

2 – Secondary Menu

This is an optional menu offer for users if wish to utilize magazine organizers pages like Home, About Us, Contact us.  If don’t wish to have it could be removed from Appearance  ⇨ Menus ⇨ Secondary Menu option from the drop down to control it.

Secondary Menu

3 – Social Media

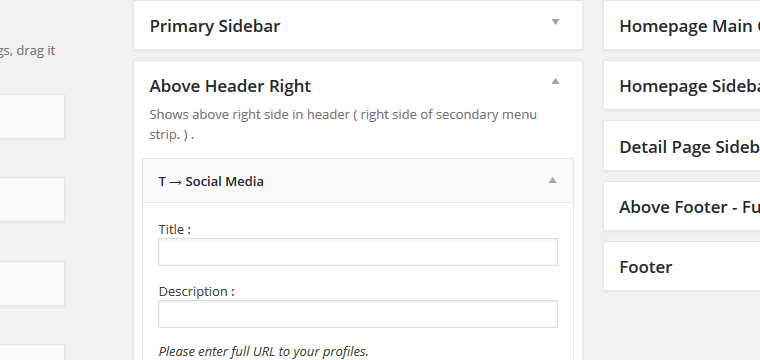
To put social media links or remove the ribbon itself you can control it from Appearance

Social Media - Above Header Right

4 – Header Right

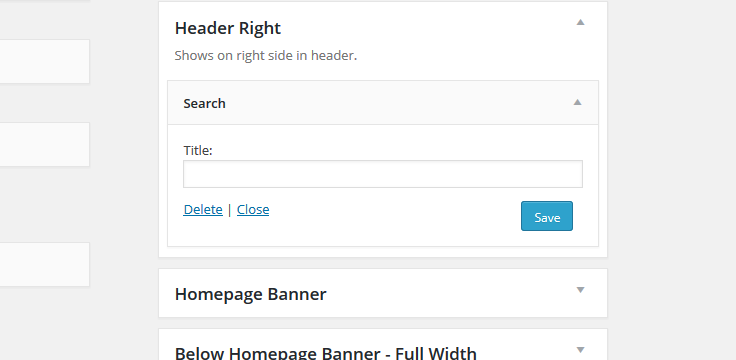
Edit this text by going to Appearance ⇨ Widgets. Expand the Header Right area and edit the Title inside that area.

Header Right

5 – Primary menu area

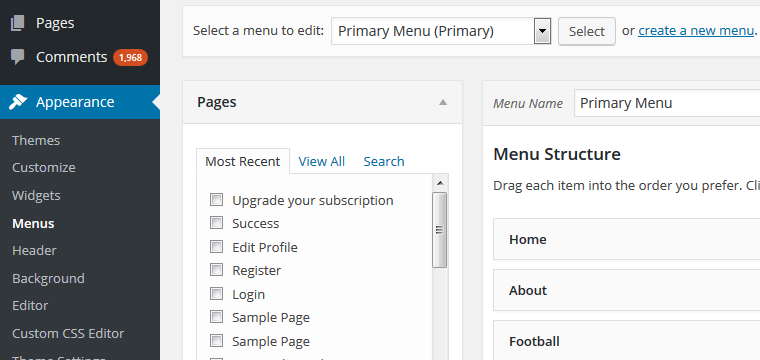
You can assign a menu here by going to Appearance ⇨ Menus and creating a menu. When you’re done select “Primary Menu” under Menu Settings ⇨ Theme Locations. For details on how to create custom menus watch the following video…

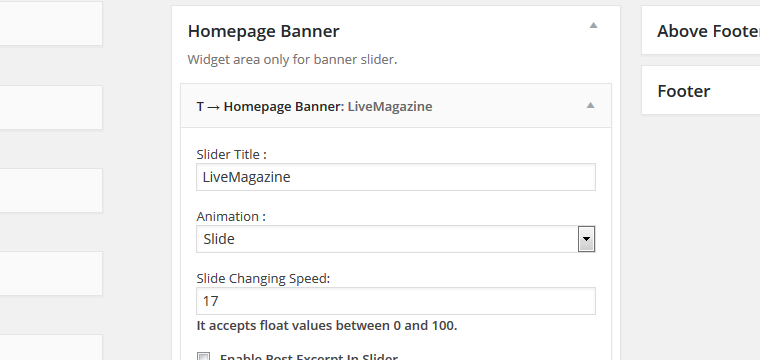
 6 – Homepage Banner area

Edit this content by going to Appearance ⇨ Widgets and expanding the Home Page banner area. Edit the Slider Title within this area. You can select the categories from which you want to pull the banners.

Homepage Banner

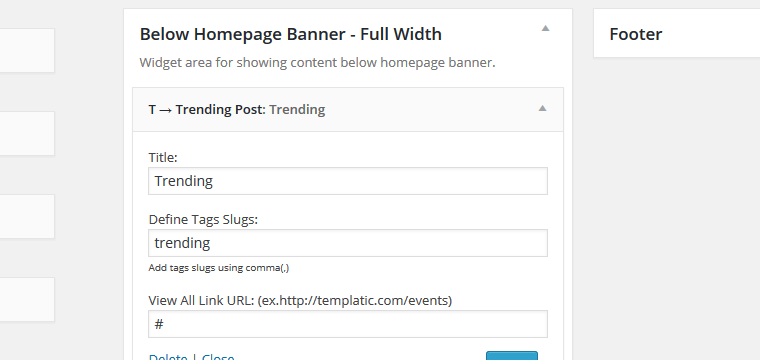
7 – Below Homepage Banner Full Width

Edit this section by going to Appearance ⇨ Widgets. Expand the Below Home Page Banner – Full width. Select the posts that you want to appear here by entering Taga Slugs. Add more than one tag slugs by including comma.

Below Homepage banner - full width

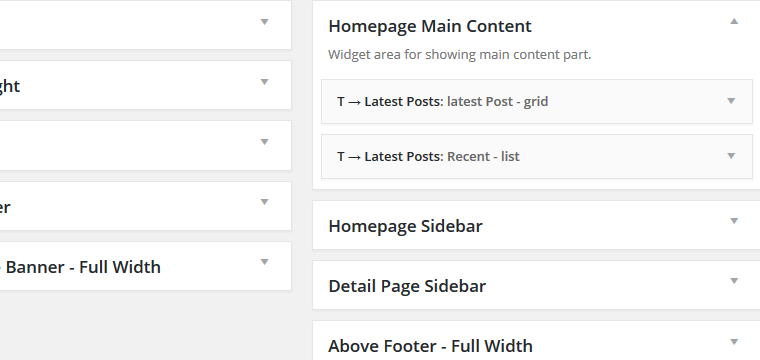
8 – Homepage Content area

Edit this section by going to Appearance ⇨ Widgets. Expand the Home Page – Content area and edit the three widgets located in there.

Homepage main content

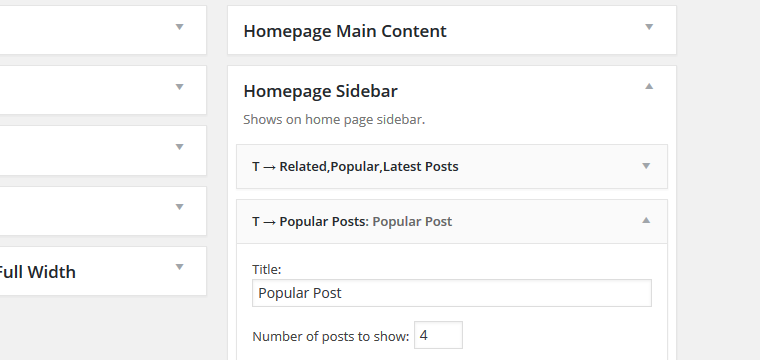
9 – Homepage Sidebar area

Edit this section by going to Appearance ⇨ Widgets. Expand the Home Page – Sidebar area and edit the widgets located in that area.

Homepage sidebar

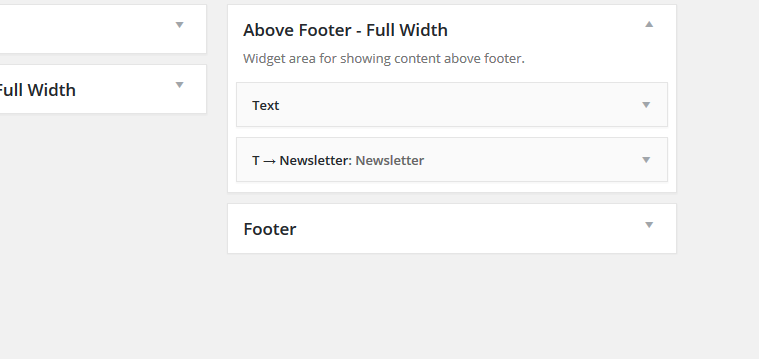
10 – Above Footer area

Edit this section by going to Appearance ⇨ Widgets. Expand the Home Page – Above footer Fullwidth area and edit the Text widget located in that area.

Above Footer Area

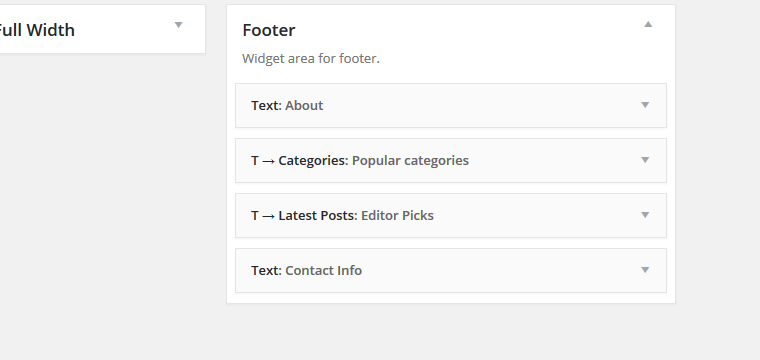
11 – Footer Area

To add, edit, remove components of this area, please go to Appearance ⇨ Widgets ⇨ Footer

Footer Area

Individual posts

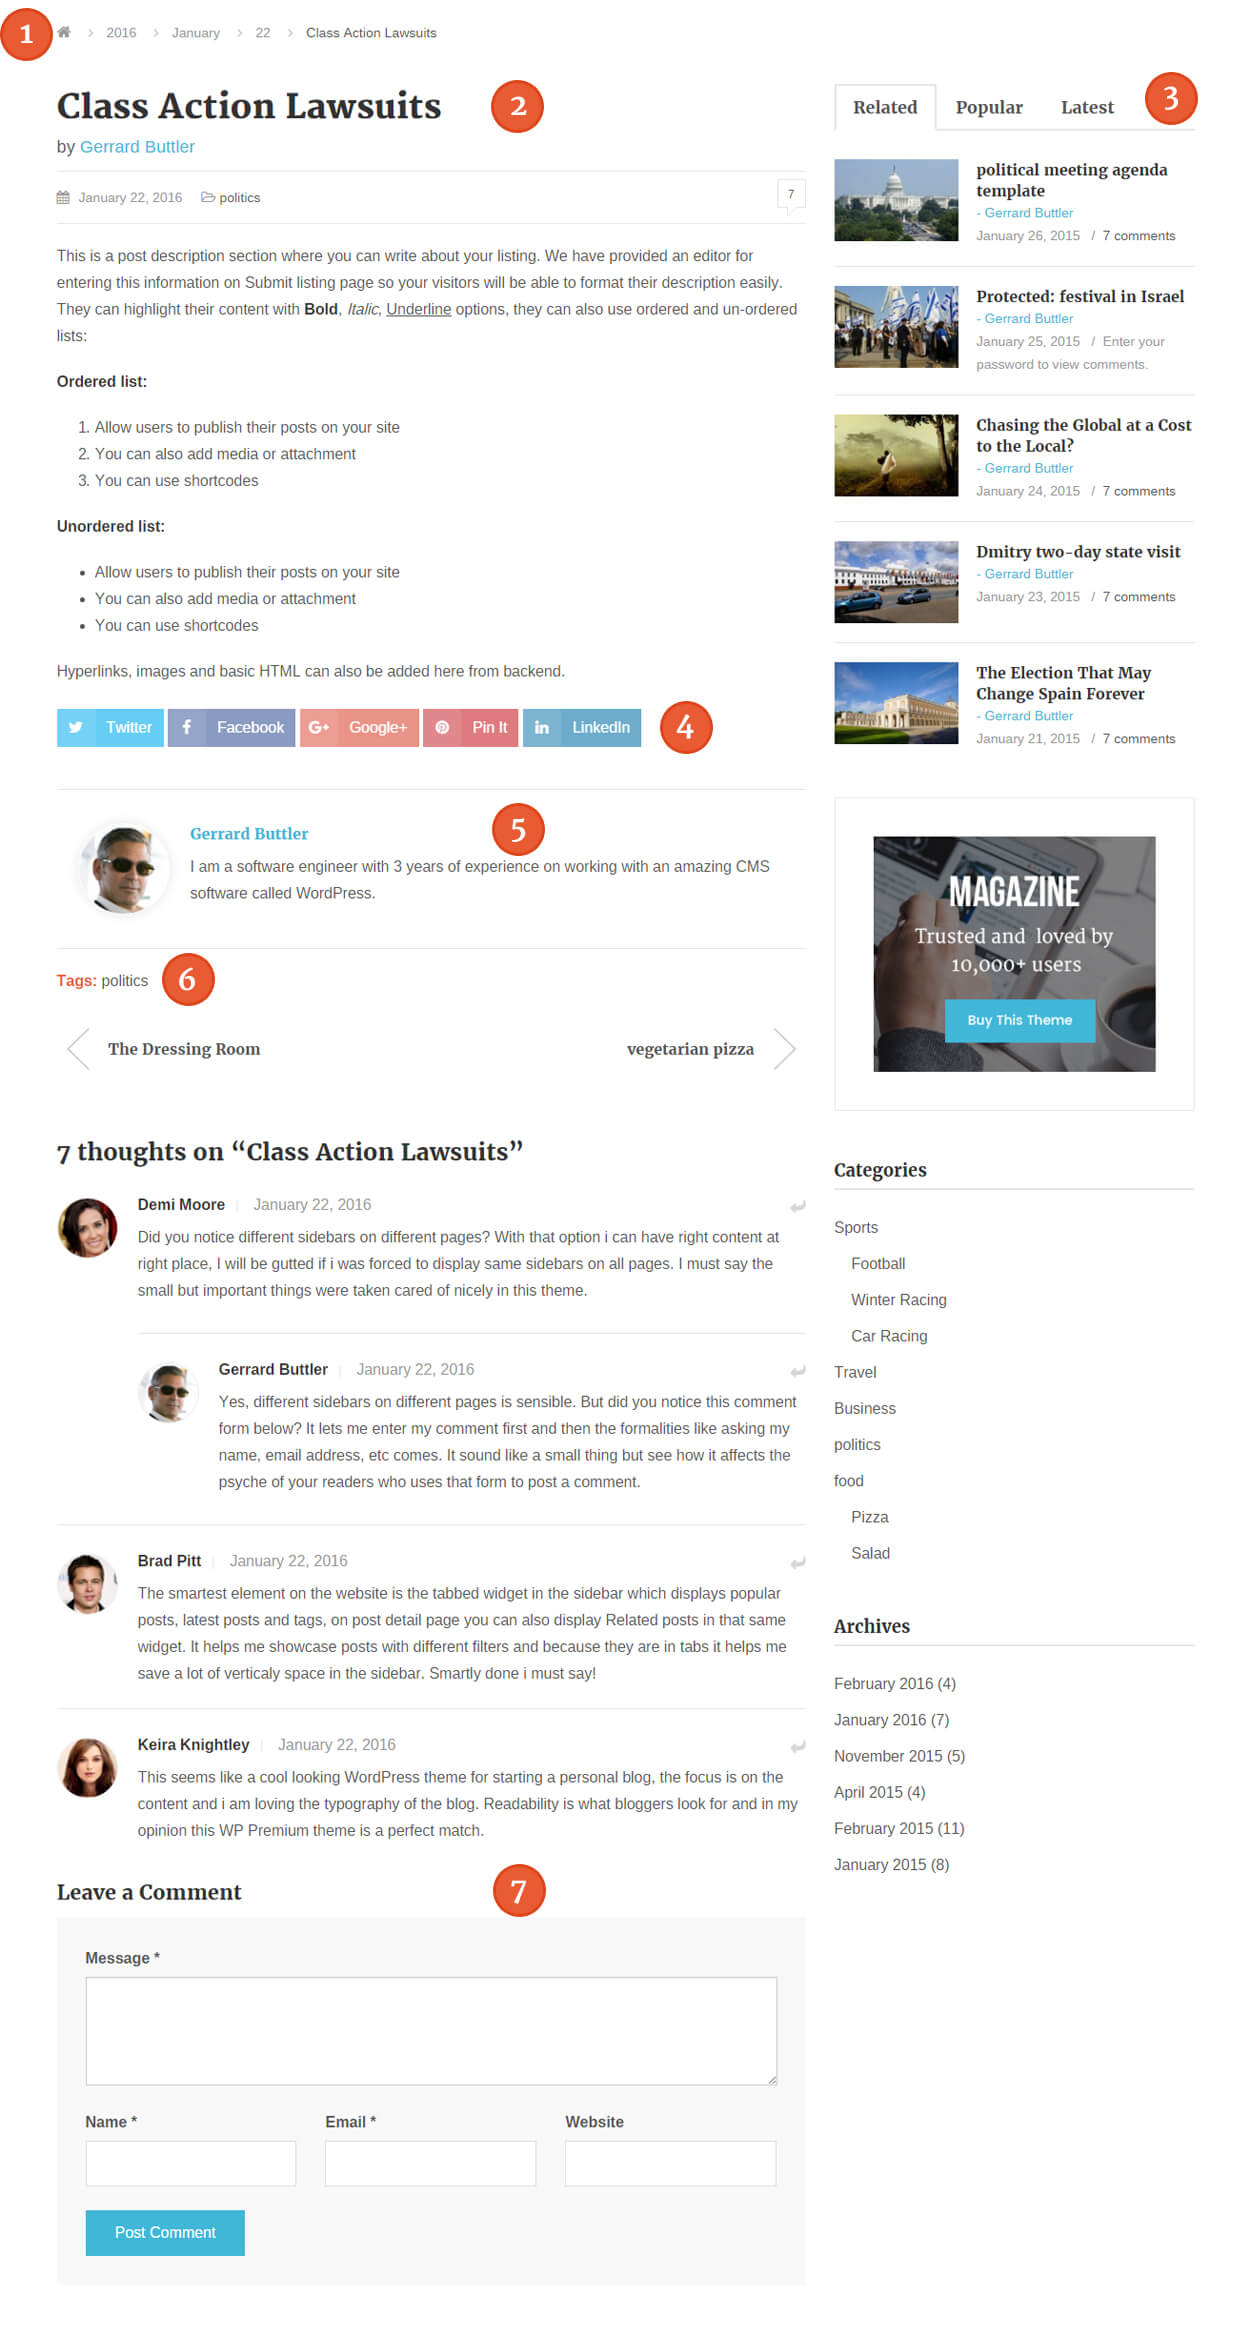
This is the page that opens when you visit a post created from wp-admin ⇨ Posts.
livemagazine-detail-page

Setting up a Blog page

The Blog is essentially just a category holding individual blog posts. Follow these steps to create a Blog…

  1. Create a new category in Posts ⇨ Categories and name it Blog.
  2. Add posts to that category by going to Posts ⇨ Add New.
  3. By adding the posts our Blog page was automatically created. You can see it by going to Posts ⇨ Categories and clicking on the “View” link next to your Blog category.

view
I also recommend adding this Blog category to your navigation menu. Do that by going to Appearance ⇨ Menus and creating a new menu. Expand the categories dropdown, choose blog and hit “Add to menu”. For details on creating custom menus watch our video tutorial.


Customization options

Changing colors

Changing colors in SmallBiz doesn’t require your to touch any code, you can do it from the Appearance ⇨ Customize ⇨ Colors section.The available options are…

  • Primary color – Affects the banner and footer background, heading link color, etc.
  • Secondary color – Changes the color of the top header strip, menu highlight color, banner buttons, icon color, etc.
  • Content color – Changes the color of your text on most pages.
  • Body Background – Changing this will change the background of the whole theme. This includes the stuff inside and outside of the main content area (the container).
  • Title Color – Changes the title color for all pages, posts and widgets.


Third-party plugin compatibility

SEO plugins

To optimize your content for search engines I highly recommend installing one of these two SEO plugins.

These plugins will work with SmallBiz in pretty much the same way as with other WordPress themes (there are no theme-specific features). For instructions on setting up each plugin just click on “detailed instructions” in the list above.

Contact form plugins

For setting up contact page (so visitors can get in touch) we’ve provided support for two plugins

Once you create the contact form (using one of the plugins) simply insert the provided shortcode inside any page or post inside the theme.

Frequently Asked Questions

How to disable the pop-in effect/animations?

To prevent the scrolling pop-in effect and make all elements show all the times go to Appearance ⇨ Custom CSS Editor and insert the following code

* .cbp-so-init .cbp-so-side {
    opacity: 1 !important;
}
* {
    transform: none !important;
    transition: none 0s ease 0s !important;
}

My homepage isn’t showing my widgets, how to fix that?

The homepage itself is a regular WordPress page created with the Home Page page template. This page (with the “Home Page” page template) is normally created during theme activation and automatically assigned as the sites front page. Please follow these steps if this page wasn’t created automatically:

  1. Go to Pages ⇨ Add New. Enter the page title as “Home” (for consistency sake, this isn’t really important) and on the right side, under Page Attributes ⇨ Template choose the “Home Page” template. Publish the page.
  2. Navigate to Settings ⇨ Reading and under “Front page displays” choose “A static page”. In the “Front page” dropdown choose “Home”.
  3. Go to Appearance ⇨ Widgets to populate the homepage with widgets.

Which sidebar area is displayed on regular pages?

It’s the “Primary Sidebar” widget area. Widgets added to that area should start showing up on regular WordPress pages (those created from wp-admin -> Pages).

How to translate LiveMagazine in a different language?

For details instructions on how to translate LiveMagazine (or any other Templatic theme) open this translation tutorial.

The post LiveMagazine appeared first on Templatic.com Documentation.
How To Change Your Payment Information for Templatic?

$
0
0

How To Change Your Payment Information Within Paypal

If you used PayPal to pay for Templatic products/renewals and need to update the payment information (change payment method or update credit card information) you will need to log in to your Paypal account to make those changes.

Here’s how to change your funding source for pre-approved payments:

  1. Log in to your PayPal account.
  2. Click Profile near the top of the page.
  3. Click My money.
  4. Click Update in the My pre-approved payments section.
  5. Click the name of the merchant for the agreement you want to change.
  6. Click Change beside Backup Funding Source in the Funding Source section.
  7. Select the payment method you’d like to use and click Save.
  8. Paypal will use that updated payment information for the next recurring payment taken for your Templatic renewal / subscription.

More information is available at PayPal: PayPal’s change payment details article


How To Change Your Payment Information Within 2Co

It’s simple to update your payment method in 2CO. You will need your Order number / Payment transaction ID & email address that you used while make the payment.

How to find Order Number?

You must have received an invoice copy from Templatic on your registered email address on purchase. It contains your Order number within the invoice. In case if you forget you can write us at support@templatic.com and we will help out.

If you would like to review an order, print an invoice, stop your recurring billing or update your billing information for a specific order, use the order look up form below…

https://www.2co.com/


The post How To Change Your Payment Information for Templatic? appeared first on Templatic.com Documentation.
Tevolution – Payeezy

$
0
0
Prerequisites Theme Installation Back-end Configuration Where to get the payment page id? Where to get the transaction id? Templatic has come up with yet another payment gateway that is simple, powerful payment option that delivers easy, scalable and secure online and mobile payments.  It creates a seamless customer experience on your website by offering more […]
Viewing all 53 articles
Browse latest View live