↧
Article 4
↧
Article 3
↧
↧
Article 2
↧
Article 1
↧
Article 0
↧
↧
Tabs Manager
Important note
The Tabs Manager plugin will not work with Directory child themes that don’t feature tabs inside their listing detail page layouts. As of this moment non-supported child themes are:
- City Guide
- Yellow Pages
Installation
- Download the plugin from the Directory ⇨ Directory Extensions section of the Templatic member area.
- Navigate to wp-admin ⇨ Plugins ⇨ Add New ⇨ Upload. Use the “Browse” button to load the previously downloaded .zip file. Click on “Install Now” to confirm.
- Once the plugin is finished installing click on the “Activate” button.
Setting up the plugin
By activating this plugin you have enabled a new checkbox inside the “Show the field in” option within the Custom Fields Setup ⇨ Add a custom field form. The checkbox name is “Detail page as a tab“. To add custom fields within the header area just select this “Detail page as a tab” option while creating new custom fields (or editing existing ones).
Organizing and ordering header fields
To change the order in which tabs appear inside the detail page go to Tevolution ⇨ Custom Fields Setup. Use drag and drop to re-organize fields. Along with the tabs section, the order you set here will apply for the submission page and the regular custom fields area (below the listing description). Vertical drag and drop order inside the Custom Fields Setup section will affect the horizontal (left to right) order inside the tab area.
Quick note: The order of default tabs such as Overview, Map, Special Offers, Video, etc. cannot be changed with drag and drop. Dragging and dropping fields inside the Custom Fields Setup section only affects your new/custom tabs.
Which custom fields to use as tabs?
Even though any field can be used as a tab, because the tabbed area (when opened) is fairly large, not every field should. Field types that work best for the tab area are the ones who require listing authors to insert lots of content. These include:
- Text Editor
- Text Area
Frequently Asked Questions
How to translate the plugin?
You can translate the plugin by using the language file located inside the /languages folder. For instructions on handling PO and POT files open the following article
http://templatic.com/docs/how-to-localize-templatics-wordpress-themes/
Where can I learn more about custom fields?
Visit the Tevolution guide. It contains the most details about custom fields
http://templatic.com/docs/tevolution-guide/#createposttype
↧
Locations
Important
Since Locations is a Directory child theme, all functionality is provided by the parent theme. Once you install Locations (using instructions provided below) please open the Directory theme guide. That is the place where you’ll find instructions on how to setup your site.
Theme Installation
Installing Directory
Because the Locations child theme is powered by Directory, you will have to install Directory in order to use the child theme. For Directory installation instructions watch the video below.
Quick note: The video will instruct you to activate Directory as the last step of installation process. Feel free to skip that part (just install Directory, don’t activate it).
The video didn’t help? Visit the Directory theme guide for more installation details.
Installing Locations
With Directory installed you’re ready to move onto the Locations child theme. Follow these steps to load the child theme and complete the installation process
- Login to Templatic member area and download the Locations child theme. You’ll find it inside the Directory Downloads ⇨ Directory Child Themes section. Click on the section to reveal the download links.
- Open your WordPress dashboard and navigate to Appearance ⇨ Themes ⇨ Add Themes ⇨ Upload. Load the .zip file you downloaded a few moments ago.
- Activate the theme once the installation process is done.
- Click on the Insert Sample Data button to quickly populate your site with relevant content. We highly recommend doing this as it makes getting to know the theme much easier.
Frequently Asked Questions specific to Locations
How to setup Locations so it looks like the demo site?
The quickest way to do this is to load the sample data from Appearance ⇨ Themes. Click on the big blue Insert sample data button to load the sample content. The content added to your site consists not only of listings, post and pages, but also widgets. Once you click on that sample data button your homepage should transform into one that looks very close to our demo.
Can’t load sample data?
If for some reason you can’t rely on sample data to populate the homepage with widgets, here’s a list widgets and widget areas that make up the homepage.
| Widget area | Widgets placed inside it |
|---|---|
| Header | T – Search by Address (shows on click) |
| Homepage Slider | T – Homepage map – multi city |
| Homepage – Main Content | T- All Categories List, T – Homepage Display Posts |
| Homepage Sidebar | T – Advertisements, T – Recent Reviews, T – Popular Posts |
| Footer | T – Newsletter, T – Social Media |
How to have the home page map like demos?
There is a grey effect on the home map. It can be given by using Map Customizer plugin. After you install & activate this plugin, there are some settings required to make it look like demos site. See here for the exact settings.
How to make my navigation menu appear in two rows?
Menu items in Locations are automatically organized in new rows. By default, 5 menu item fit inside one row; meaning the 6th item added inside the menu will go inside the new row. Good news is that you can have more than 2 rows (just keep adding items). One thing worth noting is that introducing a third row will move the logo off-center.
For general instructions on creating custom menus watch this video.
What is the perfect size for the logo?
The default logo size is 237×86 pixels. Ideally, that’s the size you should use for your own logo as well. However… the theme will work with smaller/larger logos as well.
How to set a custom background?
The background in Locations can be changed from the Appearance ⇨ Customize section. When you open the section, expand the Background Settings area, click on No Image and then on the select a file link. Locate an image on your hard drive and upload it. Once the upload is done tweak the available options (repeat, position, etc) and hit the Save & Publish button at the top.
Quick Tip: Use FullHD images (width = 1920px) for the background image. An image of that size should look good on the majority of screen sizes.
Why aren’t colors in my theme showing up as they do on the demo?
Theme activation process can mess up the colors a bit on certain servers (we’re not sure why). If your theme colors don’t look normal (for example, the header is purple instead of white) follow these steps to fix the issue
- Connect to your server via FTP
- Navigate to /wp-content/themes/Directory/library/css and open the admin_style.css file
- Delete all contents of that file
- Save the progress and upload the file
If that doesn’t help please submit a thread inside the forums, we’ll take a closer look.
How to change the orange “Featured” tag?
The easiest way to change that tag is to place the following code inside Appearance ⇨ Custom CSS Editor.
.featured_tag {
background-color: #ffcc00;
color: #545b60;
}
The “background-color” property controls the color of the strip while the “color” controls te color of the font. Use the following site to quickly obtain color codes.
↧
Real Estate Directory
Important!
Real Estate Directory is a complex theme powered by several shared components. The two most important are Tevolution and Tevolution – Location Manager. Since those plugins have documentation of their own, expect to see frequent links to those guides within this document. I know this breaks the flow when reading (and sorry for that), but it’s necessary since there are multiple themes using the same exact feature/plugin.
Quick tip: If you’re having problems locating an answer in this guide, try also opening the Directory guide. The two themes share most of the functionality.
Theme Installation
Install Real Estate Directory using the WordPress back-end
Easy installation
- Connect to the member area, expand the “Real Estate Directory” area within the “Real Estate Directory Downloads” section and download the Easy Installation .zip file.
- Login to your WordPress dashboard and navigate to Appearance ⇨ Themes ⇨ Add New ⇨ Upload. Load the .zip file you just downloaded.
- Activate the theme once the installation process is done.
- Enter the license key. You can get it from the member area, under “Your Subscriptions” inside the right sidebar. Screenshot.
- Go to the Appearance ⇨ Themes section, click on the blue “Install sample data” button to populate your site with dummy data and make it look like our demo. The dummy data activation process can last up to 1-2 minutes. Don’t interrupt it.
Traditional installation
This installation type is necessary on servers that don’t allow plugins to be loaded automatically; like during the Easy Installation process. Traditional installations basically means loading each RE Directory component separately. Instead of installing one file (like with Easy Installation) you’ll instead manually install 3 plugins and 1 theme.
- Download all files available under “Traditional Installation” inside member area.
- Login to your WordPress dashboard and navigate to Plugins ⇨ Add New ⇨ Upload.
- Load the tevolution.zip you just downloaded. Activate the plugin once the installation is done.
- Enter the license key. You can get it from the member area, under “Your Subscriptions” inside the right sidebar. Screenshot.
- Navigate to Plugins ⇨ Add New ⇨ Upload again and load the Tevolution-RealEstate.zip. Activate the plugin once the installation is done.
- Navigate to Plugins ⇨ Add New ⇨ Upload for the last time and load the Tevolution-LocationManager.zip. Activate the plugin once the installation is done.
- Navigate to Appearance ⇨ Themes ⇨ Add New ⇨ Upload. Load the RE Directory theme file you previously downloaded. Activate the theme once the installation process is done.
- While in the Appearance ⇨ Themes section, click on the blue “Install sample data” button to populate your site with dummy data and make it look like our demo. The dummy data activation process can last up to 1-2 minutes. Don’t interrupt it.
Install Real Estate Directory using FTP
Installing via FTP is necessary on servers that aren’t optimized for WordPress and can often interrupt the installation process because of the long execution time. Good news is that this type of install isn’t particularly hard, just longer compared to installing from the back-end.
For general instructions about using FTP please open this tutorial.
- Download all files available under “Traditional Installation” inside member area and extract them using software like 7-Zip. Use the “Extract here” option; don’t extract into a new folder.
- Assuming you read the above linked FTP tutorial, navigate to /wp-content/plugins/ on your server and upload the three plugin folders (Tevolution, Tevolution-RealEstate and Tevolution-Location Manager)
- Navigate to /wp-content/themes/ and upload the 4th (theme) folder
- Login to your WordPress dashboard and go to Plugins. Activate Tevolution and enter the license key available inside our member area.
- Go to the Plugins section again and activate Tevolution – Directory and then Tevolution – Location Manager.
- Navigate to Appearance ⇨ Themes and activate the RE Directory theme.
- While in the Appearance ⇨ Themes section, click on the blue “Install sample data” button to populate your site with dummy data and make it look like our demo.
Possible installation issues/errors
Because of a vast array of different server setups, RE Directory installation sometimes doesn’t go as smooth as we’d like. Here are the most frequent issues we’ve observed so far as well as instructions on how to solve them.
Blank page after activating the theme
Assuming you installed and activated the three mandatory plugins, a blank page after activating RE Directory usually means not enough server memory has been assigned to WordPress. This needs to be fixed in two stages; first we regain access to the back-end and then we make sure it doesn’t happen again.
Restoring wp-admin access
This is a common WordPress problem caused by plugin-plugin or plugin-theme conflicts. To restore the back-end we just need to deactivate the theme or plugin that caused the crash. Here are the steps:
- Connect to your server with FTP.
- Depending on what caused the crash (plugin or theme) navigate to either /wp-content/plugins or /wp-content/themes. In this particular issue, the theme caused the problem so go to /wp-content/themes.
- Rename the theme folder (in this case RealEstateDirectory) to anything else. For example: RealEstateDirectory_new
- Navigate to your WordPress dashboard (it should open now) and go to Appearance ⇨ Themes. Load a stock WordPress theme (e.g. Twenty Fourteen).
- Go back to your server and rename the theme back to its original name.
- Navigate to Appearance ⇨ Themes again and re-activate your primary theme. In our case, Real Estate Directory.
Follow these steps to fix the memory problem that caused the blank page
- Connect to your server with FTP
- Open wp-config.php located inside your root WordPress folder
- Add the following line of code at the very bottom of the file:
define( 'WP_MEMORY_LIMIT', '64M' );
500 Internal Server Error after loading sample data
From my experience this error is usually caused when the hosting provider sets the max script execution time too low. Since loading sample data can take up to a minute, the execution time needs to be long enough to complete the process. For this particular issue, we recommend contacting your hosting provider for assistance. Here are some of the things you can request/mention:
- Request them to increase the max_execution_time variable inside the php.ini file
- Ask them to tweak the max_input_time Apache setting (controls execution time for everything, not just PHP)
In case they can’t or don’t want to help, here’s something you can try using the .htaccess file: http://stackoverflow.com/a/8744184
Basic tweaks and setup
Change the logo
To change the logo go to Appearance ⇨ Customize ⇨ Site Logo ⇨ Upload image for logo. You can use that same section to change the favicon as well.
Setup the navigation menus
Real Estate Directory comes with three custom menu locations:
- Primary – displayed above the logo
- Secondary - displayed below the logo
- Footer - displayed at the very bottom of the site (next to the footer credits)
To create a menu go to Appearance ⇨ Menus. When done, just assign it to one of the three areas mentioned earlier. For detailed instructions on how to do this, watch the following video
How to create a mega menu?
Mega Menus are navigation menus with multiple columns under a single menu item. An example of such a menu can be seen by visiting the RE Directory demo site and hovering over the “Theme Features” menu item.
For details on creating a mega menu visit the mega menu tutorial.
Enable registration and setup register/login forms
To enable registrations inside WordPress navigate to Settings ⇨ General and choose “Anyone can register” under the “Membership” option.
Installing the theme created two important pages: Login and Register. You will find these pages in Pages ⇨ All Pages. From there you can change the page name and even the content. Do not remove the shortcode from each page as that’s what’s generating the login/register forms within the pages.
Have you accidentally deleted those pages? Try re-generating them by going to Tevolution ⇨ Overview and deactivating and then re-activating the User registration/Login Management module. If that doesn’t help, open this page for more info.
Setup permalinks
To enable “pretty” permalinks on your site navigate to Settings ⇨ Permalinks and enable the “Post name” option. The Real Estate Directory theme has been tested and optimized for this particular permalink setting. You are welcome to try others, but we cannot guarantee they will work.
Change theme colors
Using the WordPress Customizer you can change the colors in real-time. To do that head over to Appearance ⇨ Customize ⇨ Color Settings. Edit an option and wait a few moments to see how it affects your site.
From the Customizer you can also change the background, just expand the “Background Settings” section. Once the background image is uploaded you’ll be able to tweak it’s position, repeat property and attachment.
Remove footer credits
The credits can be removed from Appearance ⇨ Customize ⇨ Footer. Instead of the code there by default, enter this instead
<p class="copyright">© 2014 Your Website Name</p>
Change the currency
If you’re not in the United States or a territory that uses USD as their currency, head over to Tevolution ⇨ Monetization ⇨ Payment Gateways (tab) to change it. Instead of $ enter your currency symbol and instead of USD enter the three-letter currency code. Visit this website if you’re unsure what the code is for your country.
In case your currency symbol is on the wrong side of the value, edit the “Currency Position” option.
Setup cities
Real Estate Directory comes with the ability to add multiple cities within the theme. Once added, these cities become content filters. In other words, if a property is added to one city (e.g. New York), it won’t display in other cities (e.g. London). It’s worth noting that these filters affect everything, not just the homepage map. If you try searching for a New York property within London, you simply won’t be able to find it. To create and manage cities go to Tevolution ⇨ Manage Locations.
This multi-city feature is powered by the Location Manager plugin and is enabled by default. Disabling that plugin puts Real Estate Directory into a single-city mode.
For details on creating and managing cities open the Location Manager guide.
Single city functionality
If you plan on using RE Directory as a classic directory where cities don’t matter, the multi-city feature will just get in the way. Follow these steps to get started:
- Go to wp-admin ⇨ Plugins and deactivate the Tevolution – Location Manager plugin.
- Go to Appearance ⇨ Widgets and place the T → Homepage Map – single city inside the Homepage Slider area.
- Tweak the map location and settings by going to Tevolution ⇨ Map Settings.
The biggest benefit of using a single city is the boost in performance. Without all those additional filters/queries your site will work noticeably faster. Another benefit are cleaner and shorter URLs. Without the Tevolution – Location Manager plugin, your URLs won’t have the /city/city_name slug within them.
Add a property
Add properties from the back-end
To add a property go to wp-admin ⇨ Properties ⇨ Add Property. Inside the “Add Property” screen that opens you should enter the property title, description and populate the fields listed under “Property Information” section. You can control which fields show inside this area from Tevolution ⇨ Custom Fields Setup. For more details on that section open the Tevolution guide.
Below the “Property Information” area you should see available price packages. To create and manage your price packages navigate to Tevolution ⇨ Monetization.
For more information on property detail pages open the “Manage Pages ⇨ Detail page” section of this guide
Add properties from the front-end
Front-end submission is done using the “Submit Property” form. A page containing this form should have been created when you activated the theme, you’ll find it from wp-admin ⇨ Pages. The URL of that page will be something like www.your-domain.com/submit-property. In case you deleted this page (or it was never created), go to Pages -> Add New, insert the following shortcode, set a title and publish the page:
[submit_form post_type='property']
Now that the page is created, both you (the admin) and your visitors can use it to submit content. Similar to the back-end submit section, most of the input fields available inside the form can be modified from the Tevolution ⇨ Custom Fields Setup section. You can also use that section to add new fields. To modify the “Select a package” section of the submission form, navigate to Tevolution ⇨ Monetization section. Click here for details on how to create price packages.
How and where to moderate user submitted properties?
Once users submit properties, the will show up inside the Properties ⇨ Properties section. From there you can draft, publish or edit them. Another place from where you can manage them is Tevolution ⇨ Transactions. Use that section to bulk-confirm or bulk-deny transactions/listings.
To set the default status for submitted properties (publish/draft) head over to Tevolution ⇨ General Settings ⇨ Submission page settings ⇨ Default status for free/paid submissions
For more details about transactions click here.
Manage pages
Homepage
Assuming you loaded dummy data, when you open your sites homepage you should see widgets since basically the whole homepage is widgetized. The homepage itself is a regular WordPress page created with the Home Page page template. This page is normally created during theme activation and automatically assigned as the sites front page. However, if it’s not, i.e., if your homepage is not showing widgets follow these steps to fix it:
- Go to Pages ⇨ Add New. Enter the page title as “Home” (for consistency sake, this isn’t really important) and on the right side, under Page Attributes ⇨ Template choose the “Home Page” template. Publish the page.
- Navigate to Settings ⇨ Reading and under “Front page displays” choose “A static page”. In the “Front page” dropdown choose “Home”.
- Go to Appearance ⇨ Widgets to populate the homepage with widgets.
To learn more about the homepage and each of its elements, check out the image displayed below.
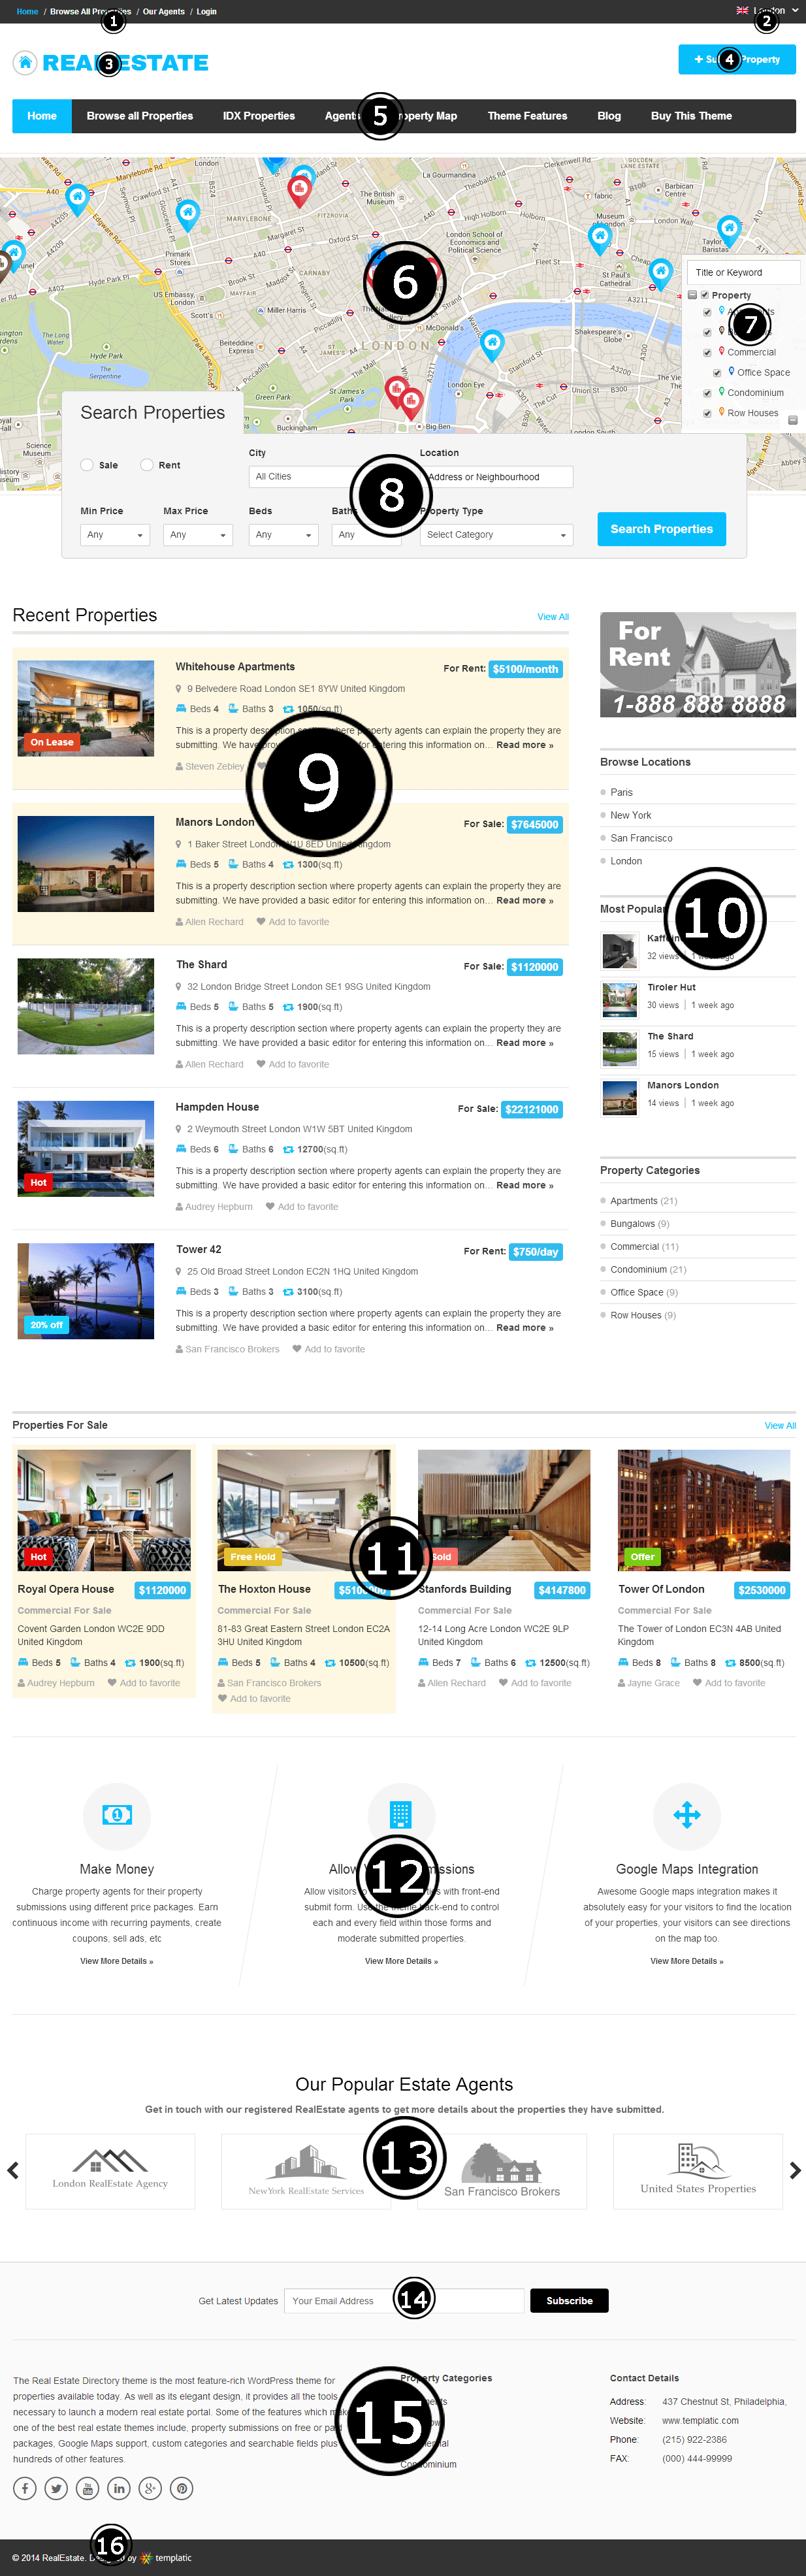
1 – Primary navigation menu area
By default this menu area doesn’t show inside the theme. To make it show head over to Appearance ⇨ Menus, create a menu and assign it to the “Primary” location (under Menu Settings). For more details on how the menus actually work, check out this video.
Quick note: Login and Register buttons are added automatically to this menu. Also, the Register button will show only if the “Membership” option is turned on in Settings ⇨ General.
2 – City selector
This is the location from where visitors can change their active city (click here for more info on cities). You can change settings for this area from Tevolution ⇨ Manage Locations. Changing the first two options inside the Manage Locations section can drastically change the look and content of that field. For more details on city selectors open the Location Manager guide.
Quick note: If you cannot see that city selector at the top it likely means that you haven’t activated (or installed) the “Tevolution – Location Manager” plugin.
3 – Site logo
To change the logo go to Appearance ⇨ Customize ⇨ Site Logo ⇨ Upload image for logo. You can use that same section to change the favicon as well.
4 – Submit Property button
This button was created using the simple “Text” widget. To create one of your own go to Appearance ⇨ Widgets and place the “Text” widget inside the “Header” widget area. Leave the Title field empty and enter this inside the Description box:
<a href="http://DOMAIN-NAME.COM/submit-property/" class="submit-large-button button"><i class="fa fa-plus"></i> Submit Property</a>
Don’t forget to enter your domain instead of DOMAIN-NAME.COM. For general details about the Submit Property form click here.
5 – Secondary navigation menu area
To setup the main menu navigate to Appearance ⇨ Menus. When done creating the menu assign it to the “Secondary” location. For detailed instructions on using menus watch this video
Want to style your navigation bar with icons?
If yes, just use Front Awesome icons. To apply an icon expand the menu item you want to edit and insert the icon code inside the “Navigation Label” field (next to your item name). For example:
<i class="fa fa-home"></i> Home
<i class="fa fa-spoon"></i> Restaurants
If you did everything correctly, your menu should look something like this
6 – Homepage map
The homepage map can be enabled/displayed by going to Appearance ⇨ Widgets and placing the “Homepage map – multi city” or “Homepage map – single city” widget inside the “Homepage Slider” widget area. Picking the correct widget (single or multi city) is easy… if the Tevolution – Location Manager plugin is enabled on your site (it is by default) then you should use the multi city variant. If it’s disabled, use the single city variant. The instructions below will focus on the multi city map, for more details on single city functionality click here.
If you loaded the dummy data your homepage map should already be showing. In that case head over to Tevolution ⇨ Manage Locations to edit the map. The map you see on the homepage is directly connected to the city it’s supposed to show. In other words, to edit the map, edit the city. Screenshot.
When editing a city, use the small map displayed under the “City Name” field to set the position of the map. You can alter the position after clicking on “Set address on map” by dragging the pinpoint icon within the map. Control how much (or how little) of your city is shown by adjusting the “Map scaling factor”.
Quick tip: To edit the map markers go to Properties ⇨ Property Categories and assign a custom icon to each category. For a nice selection of free icons check out this blog post.
Want to display a slider instead of the map?
To achieve this just go to Appearance ⇨ Widgets and place the “T – Homepage Slider” widget into the “Homepage Slider” widget area. To display static images inside the slider check the “Use custom images” box inside the widget and enter image URLs. You can upload images from Media ⇨ Add New. Don’t forget to copy the “File URL” value after uploading an image.
7 – Map categories
Just like the actual map, map categories are also assigned while creating/editing the city. Head over to Tevolution ⇨ Manage Locations and edit a city (or create a new one). To make sure your categories are displayed make sure to make a selection inside the “Post Type” and “Categories” field.
8 – Homepage search widget
To enable this section (if it isn’t already) navigate to Appearance ⇨ Widgets and place the “T – Property Search” widget inside the “Homepage Slider” area. Make sure to place this widget below the Homepage Map widget.
Configuring this area is available from Tevolution ⇨ Custom Fields Setup. To add new search fields click on the “Add a custom field” button and be sure to checkmark “Property Search Widget” inside the “Show the field in” option. Keep in mind that you’ll need to assign some values to these new fields (in your properties) in order for them to produce any results.
Quick tip: To edit the position of your custom fields within the homepage search widget click on the “Manage Search Custom Fields” tab inside the Custom Fields Setup section and then use drag and drop to move the fields around.
9 – Homepage main content area
This area is primarily used for displaying recent or featured properties. To show properties go to Appearance ⇨ Widgets and place the “T – Homepage Display Properties” widget inside the “Homepage – Main Content” area.
10 – Homepage sidebar
Edit this section by going to Appearance ⇨ Widgets and placing widgets inside the “Homepage Sidebar” widget area. Widgets used in the image above are:
- T – Advertisements
- Navigation Menu
- T – Popular Posts
- T – Browse by Categories
11, 12 and 13 – Full width homepage area
Edit this section by going to Appearance ⇨ Widgets and placing widgets inside the “Below Home page content” widget area. Widgets used in the image above are:
- T – Homepage Display Properties
- Text (get the code from here)
- T – Homepage Slider (use the carousel slider option)
14 – Above footer
Edit this section by going to Appearance ⇨ Widgets and placing the “T – Newsletter” widget inside the “Inside Home page Footer” widget area.
15 – The footer
Edit this section by going to Appearance ⇨ Widgets and placing widgets inside the “Footer” widget area. Widgets used in the image above are:
- T – Social Media
- Categories
- Text (get the code from here)
16 – The credits
For more details on editing/removing credits open the Remove footer credits section of this guide.
Category page
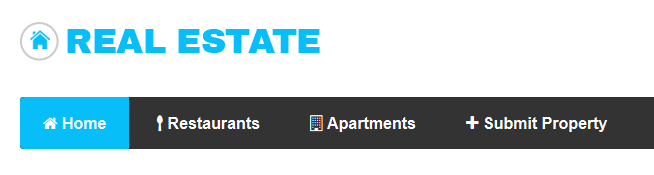
Category pages (as the one screenshoted below) are generated automatically as soon as you create a category from Properties ⇨ Property Categories. For more details on how to edit each of the category page components check out this image…
1 – Category page map
The category page map is very versatile, it can be displayed in three ways:
- Full width and below the menu (as displayed inside the screenshot above)
- As a tab (next to List and Grid buttons)
- As a sidebar widget
Full width map
To make the map display in the same way as displayed above, go to Tevolution ⇨ Map Settings and make sure the “Show map view in category pages” is unchecked. With that done, go to Appearance ⇨ Widgets and place the “T – Category Page Map – multi city” widget inside “Property Category Pages – Below Header” area.
Note: If you’re using RE Directory in single city mode, use the single city widget variant instead.
Map as a tab
To use the map as a tab you don’t have to do anything accept make sure that the “Show map view in category pages” option inside Tevolution ⇨ Map Settings is checked (enabled).
Sidebar widget
To make the map display inside your sidebar, go to Tevolution ⇨ Map Settings and make sure the “Show map view in category pages” is unchecked. With that done, go to Appearance ⇨ Widgets and place the “T – Category Page Map – multi city” widget inside “Property Category Page Sidebar” area.
Note: If you’re using RE Directory in single city mode, use the single city widget variant instead.
2 – Category description
This text can be entered while creating (or editing) a category from Properties ⇨ Property Categories. Screenshot.
3 – View switchers
Using these buttons you can quickly change the layout of the page from grid to list. If you enable the “Show map view in category pages” option inside Tevolution ⇨ Map Settings you can make a third button appear here – Map View. To set the default view for category pages go to Tevolution ⇨ General Settings ⇨ Category Page Settings ⇨ Default page view.
4 – Sorting options
Using this sorting options dropdown visitors can easily change the sorting method used to display the properties. By default the theme will show only two options (Price high-low and low-high). To add more options go to Tevolution ⇨ General Settings ⇨ Category Page Settings and check the boxes inside the “Sorting options in sorting box” option.
5 – Category page sidebar / Property filters
You can edit this area of the theme by going to Appearance ⇨ Widgets and placing widgets inside the “Property Category Page Sidebar”. The most important widget inside this area is “T – Property Filters”. This widget will allow visitors to filter through displayed properties in real time. You can edit the fields that appear inside the widget by going to Tevolution ⇨ Custom Fields Setup.
For instance, to add more options inside the “Property Status” area, edit the “Property Status” custom field. Add new options by editing “Option Title” and “Option Values”.
6 – The actual properties
This area displays the actual properties within the category.
If you’re looking to customize this section, use the following action hook: property_post_info
Here the full code from the function that displays the custom fields + content within each of the category page properties
http://snippi.com/s/exjo599
7 – Pagination
Pagination doesn’t have any special options within RE Directory, but you can still control exactly how many properties show per each page. To do that go to Settings ⇨ Reading and edit the “Blog pages show at most” option.
If you’re looking to remove those button, add this to Appearance ⇨ Custom CSS Editor
body.taxonomy #listpagi {
display: none;
}
Property detail page
The property detail page is what you get after opening an individual property (created from Properties ⇨ Add Property). For more info on each element within that page check out the image below.
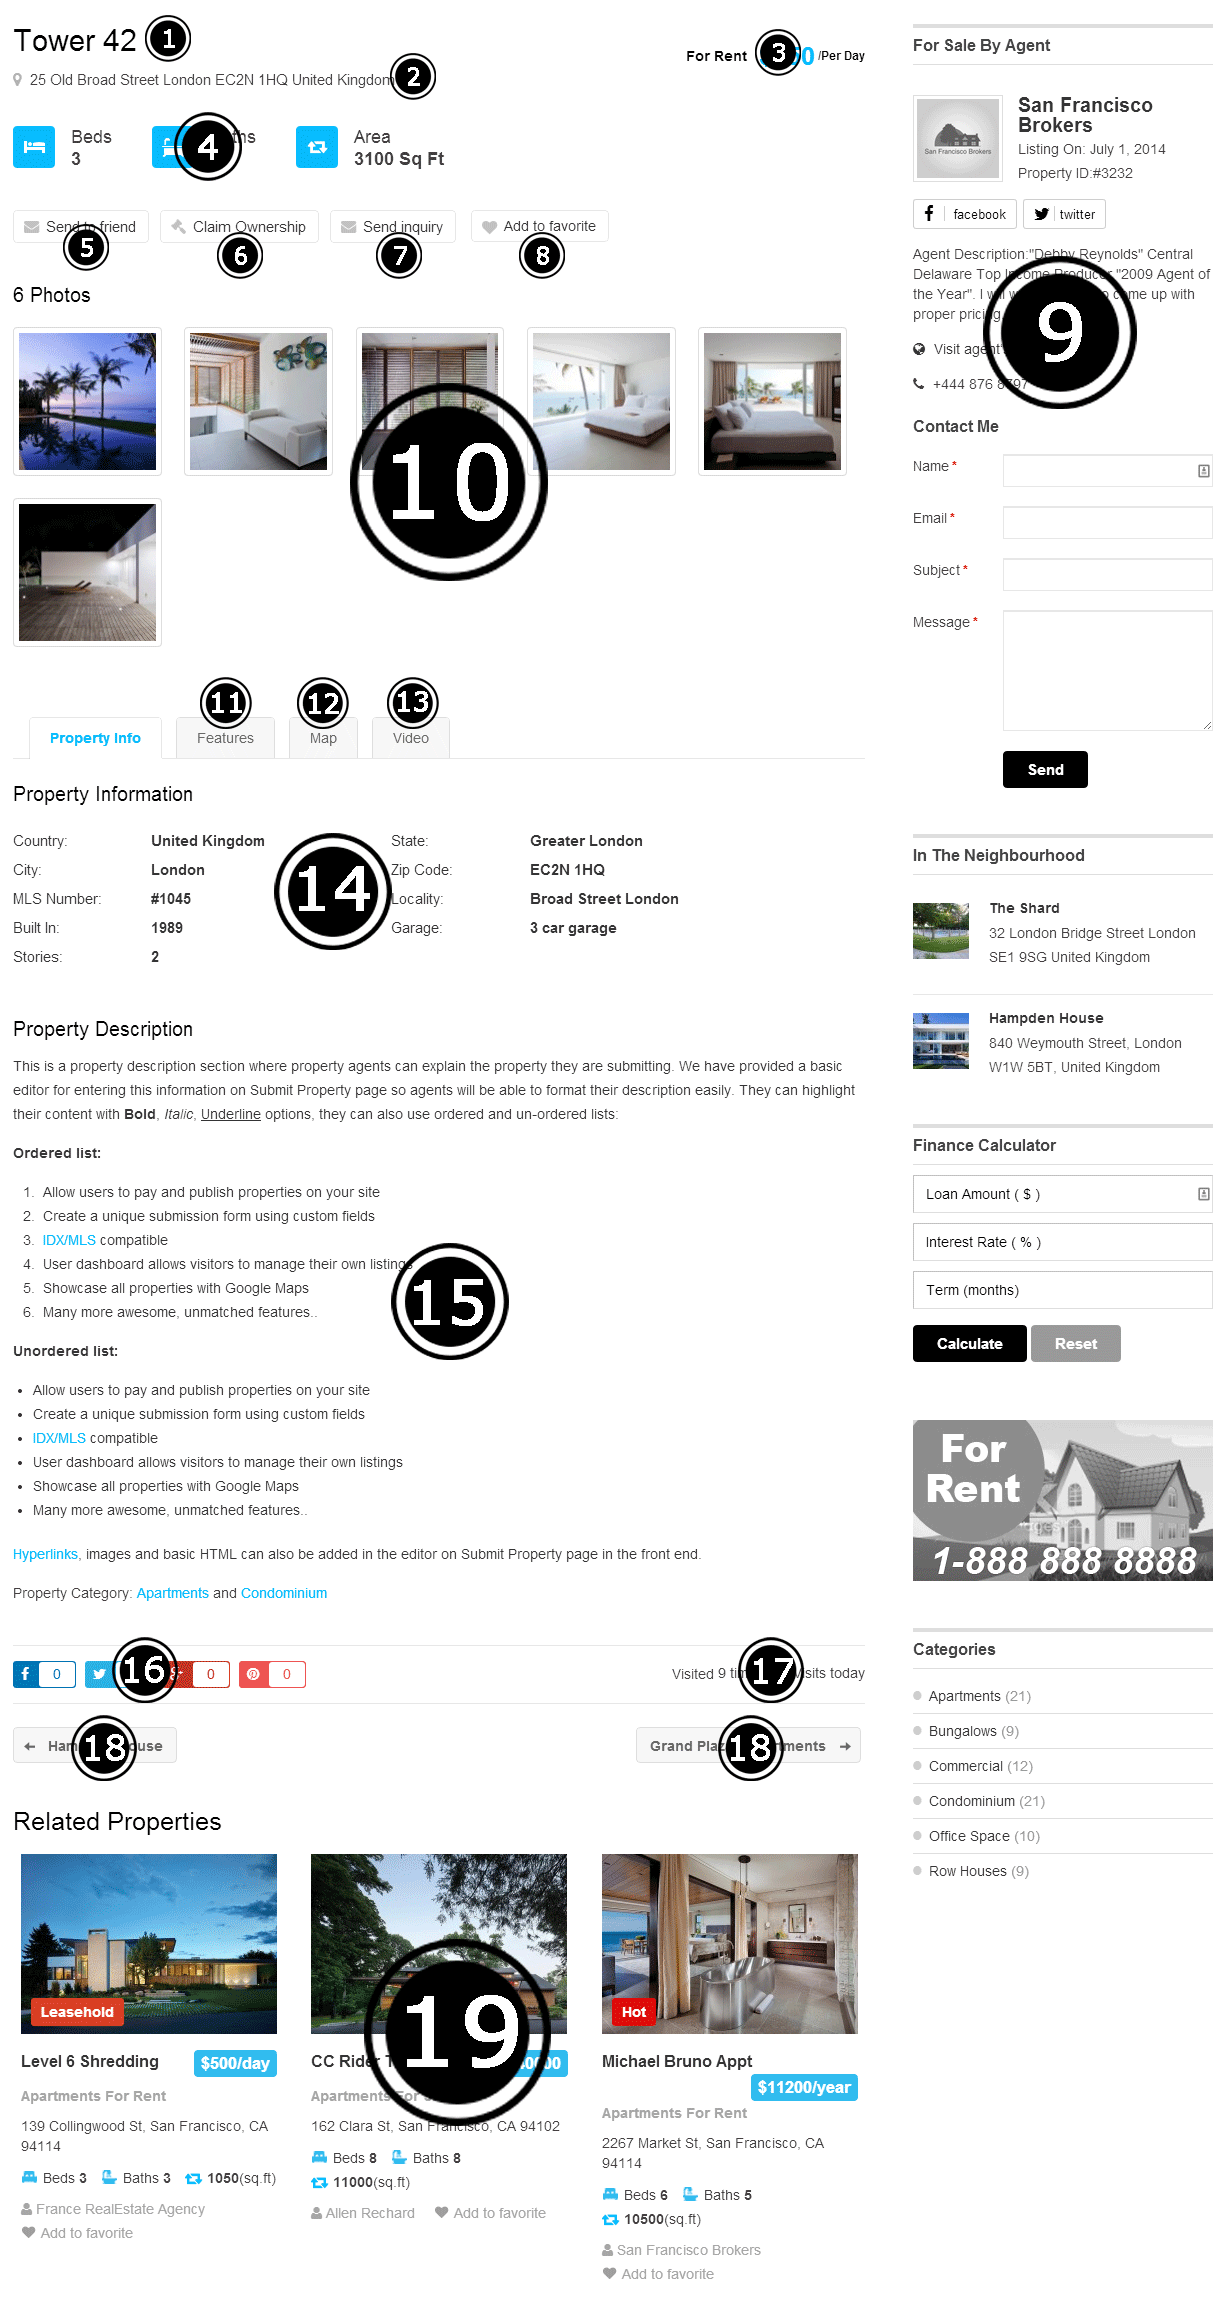
1 – Property title
This is the first bit of information you enter when creating properties from both the front-end and back-end.
2 – Property address
The information shown here corresponds with the value entered inside the “Address” field when submitting a property. The address field is available for editing from Tevolution ⇨ Custom Fields Setup section.
3 – Property price
The information shown here corresponds with the value entered inside the “Price” field when submitting a property.
Note: Enter whole numbers when defining prices. The theme will add thousand and decimal separators automatically.
4 – Highlighted fields
Adding/editing fields in this area is possible only by customizing the theme code. To edit that area use the following action and function
http://snippi.com/s/x66a1zl
If you want to remove that whole section add this to Appearance ⇨ Custom CSS Editor
body.singular-property .entry-header-custom-wrap {
display: none;
}
5 – Send to friend form
This contact form allows visitors to quickly email a friend about the property (by sending the link). If you want to disable the form, do so from Tevolution ⇨ Email Settings ⇨ Enable additional forms.
6 – Claim ownership form
The main purpose of this feature is to allow visitors to claim listings on your site as their own. This is particularly useful in the early days of the site since you (the admin) will most likely add a lot of content yourself in order to make the directory appear bigger. The Claim Ownership feature will make it easier to transfer that listing to the rightful owner when he/she requests control over it.
Setting up/activating Claim Ownership
- Go to wp-admin ⇨ Tevolution ⇨ Overview and activate the Claim Post Manager module.
- Navigate to Tevolution ⇨ General Settings ⇨ Claim ownership settings and select the post types for which you want to enable Claim Ownership.
Quick note: The “Claim Ownership” button (inside a listing detail page) will not show to the listing owner. If you’re testing the functionality make sure you’re not logged in as admin.
Processing a claim
Once a visitor fills in the information requested by the Claim Ownership form the rest is up to you. Here are the steps…
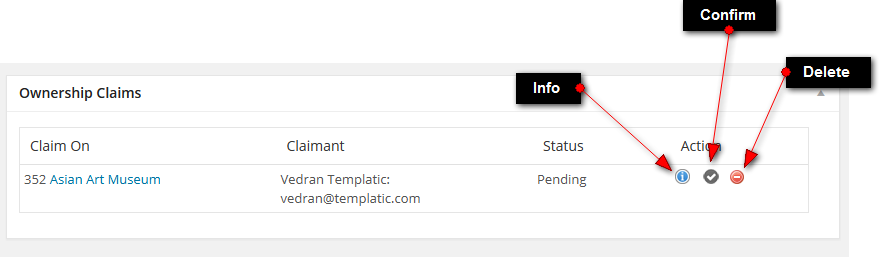
- Go to wp-admin ⇨ Dashboard. Focus on the “Ownership Claims” widget. If you can’t see it, make sure the Claim Ownership module is enabled from Tevolution ⇨ Overview. You can also check the “Screen Options” button (top right corner) and see if it’s enabled there.
- Review the claim (click on the info icon) and choose the appropriate action by either confirming or deleting the claim
![]()
- If you confirm the claim, proceed with locating the new owners account. To do that, navigate to wp-admin ⇨ Users.
- Use the search function to look for a user with the email address mentioned inside the claim. If you get a hit, remember that username. If you don’t, add a new user by going to Users ⇨ Add New. Use the same email address that was mentioned inside the claim.
Important: While creating/editing the user set the role to “Contributor”.
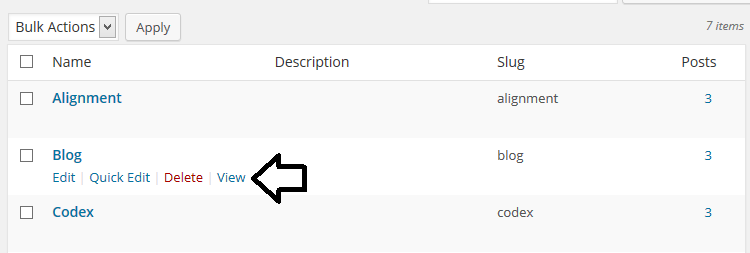
- Assign the listing to a user by going to wp-admin ⇨ Listings. Click on the “Quick Edit” button that appears while hovering over listings and edit the “Author” dropdown. Screenshot.
- Optional: Go back to the Users section and set the role back to “Subscriber”. To learn more about the differences between each role open this codex entry.
7 – Send Inquiry form
This form allows visitors to get in touch with the property owner, i.e. the person who submitted the property to the site. The same thing can be achieved by using the contact widget displayed at the top of the sidebar.
The send inquiry form can be disabled from Tevolution ⇨ Email Settings ⇨ Enable additional forms.
8 – Add to favorites button
The favorites button allows website visitors to save specific properties for later viewing. Once saved (favorited), the property will become available inside the visitors front-end profile, under the “My Favorites” tab. Screenshot.
9 – Property detail page sidebar
To edit this area go to Appearance ⇨ Widgets and place widgets inside the “Property Detail Page Sidebar” area. The widgets used inside the image above are:
- T – Property’s Agents Details
- T – In The Neighborhood
- T – Finance Calculator
- T – Advertisements
- T – Browse by Categories
10 – Property images
Here displayed are the images assigned to the property while submitting it. Images can be added (from the back-end) by using the “Image Gallery” section inside the right sidebar. Please note that you need to upload new images in order to add them to the gallery.
11 – Features tab
The contents of the “Features” tab match up with the information added to the “Additional features” custom field while submitting a property. The field can be modified or disabled from Tevolution ⇨ Custom Fields Setup.
Quick note: To add other custom fields as tabs check out the Tabs Manager add-on.
12 – Map tab
The map tab shows a map of the location entered inside the “Address” field. The directions should be displayed inside the same language as your browser. Default language is English.
13 – Video tab
This tab will display a video under condition that the “Video” field is not empty. To edit/remove the tab, just edit the “Video” field inside Tevolution ⇨ Custom Fields Setup.
14 – Property information section
This is the main area in which the values assigned to your custom fields are displayed. The area will display both old (pre-loaded) fields and the new ones that you created. To edit field labels or even remove whole fields, use the Tevolution ⇨ Custom Fields Setup section.
Quick note: To hide a value from the detail page (but still keep the field active) uncheck the “Detail page” option inside the “Show the field in” area.
15 – The content
This is the primary description (content area) of your property. Feel free to use HTML and CSS to style the text. There are even plugins that allow you to execute PHP.
16 – Social sharing buttons
Website visitors will be able to use these buttons to share properties on Facebook, Twitter and other networks. You can enable/disable individual options from Tevolution ⇨ General Settings ⇨ Detail page settings ⇨ Show sharing options for.
17 – View counters
View counters show how many times that page has been opened today and all time. They can be disabled from Tevolution ⇨ General Settings ⇨ Detail page settings ⇨ Show view counter
18 – Next/Previous property buttons
These buttons allow visitors to quickly navigate to the next property within the same category as the one being displayed. If you don’t need these, hide them by adding the following code to Appearance ⇨ Custom CSS Editor.
.singular .pos_navigation {
margin-bottom: 0px !important;
visibility: hidden;
}
19 – Related properties
This section shows properties from the same category (or tag) as the one currently displayed. For editing related properties settings navigate to Tevolution ⇨ General Settings ⇨ Detail page settings. First 4 options within that section are dedicated to “related properties” section.
To edit that section of the theme use the following action and function
http://snippi.com/s/qqnsdl9
Setting up the Blog
The Blog in RE Directory is essentially just a category holding individual posts. So… follow these steps to create a Blog
- Create a new category in Posts ⇨ Categories and name it Blog.
- Add posts to that category by going to Posts ⇨ Add New.
- By adding the posts our Blog page was automatically created. You can see it by going to Posts ⇨ Categories and clicking on the “View” link
Quick tips
- To increase the number of entries available per-page on category pages (default is 5), go to wp-admin ⇨ Settings ⇨ Reading and change the value associated with the “Blog pages show at most” option.
- I also recommend adding this Blog category to your navigation menu. Do that by going to Appearance ⇨ Menus and creating a new menu. Expand the categories dropdown, choose “Blog” and hit “Add to menu”. For details on creating custom menus watch our video tutorial.
Agent profile/dashboard page
This is the page that opens when you visit your own profile within the theme. Each users profile page can be accessed from a URL like this one: your-domain.com/author/the_username. Another way to access it is by clicking on your username inside the top navigation bar.
From the dashboard page all website users can manage their submitted properties, favorites and of course their own profile. The best part of the dashboard page is that you can control exactly which info appears there. Go to Tevolution ⇨ Profile Fields Setup to edit existing profile fields or add new ones.
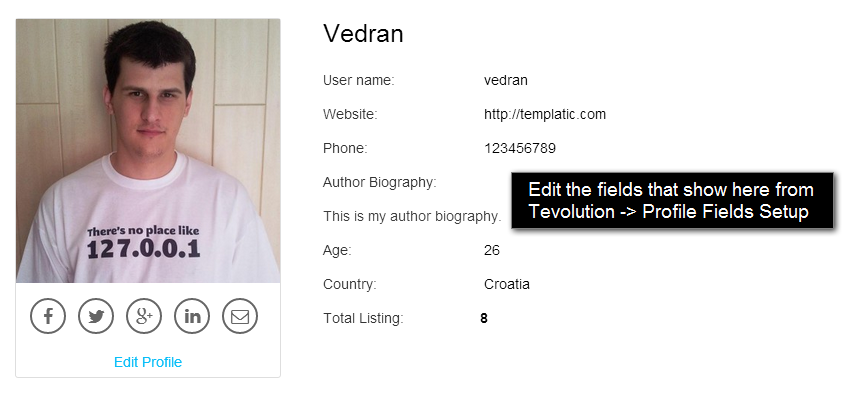
Note: When creating a new profile field make sure to check-mark “User dashboard page” within the “Show the field in” option. If you don’t, the value won’t show inside the user dashboard page.
How to edit my profile?
Each user can edit their profile from this URL: your-domain.com/profile. A link to this page is also provided underneath the avatar inside the author/dashboard page. To modify the profile page, go to Pages ⇨ Add New and edit the “Profile” page. The profile page is a regular WordPress page with a shortcode that generates the profile fields. This allows you to easily add new content inside the page (above or below the profile fields) or to change its title or slug.
If you accidentally deleted the profile page, re-create it by following these steps:
- Go to Pages ⇨ Add New and create a new page. Enter whichever title you want.
- Insert the following shortcode as the content for that page
[tevolution_profile]
- Go to Tevolution ⇨ General Settings ⇨ Registration options and choose the page you just created within the dropdown for the “Profile Page” option.
How to edit profiles from other users?
As the admin, you can edit profiles from all members by going to the wp-admin ⇨ Users section.
How to create an “Agents” page as seen on the demo?
This is the page in question. It has been automatically created when you installed the theme. You’ll find it inside the wp-admin ⇨ Pages section.
If you accidentally deleted the agents page, re-create it by following these steps:
- Go to Pages ⇨ Add New and create a new page. Enter whichever title you want.
- Insert the following shortcode as the content for that page
[tevolution_author_list role='subscriber' users_per_page='8'][/tevolution_author_list]
Monetization (making money)
The primary way to make money in Real Estate Directory is to charge for content submission. This is done by creating price packages (payment plans) for the Submit Property form.
Price packages
To create a price package head over to Tevolution ⇨ Monetization ⇨ Price Packages ⇨ Add New Package.
Submitting a package
The “Add New Package” form contains a number of options. Here are additional details about the most important ones:
Package type
- Pay per post – this option is ideal for home owners who are looking to add their house to your website. Price packages of this type require payment for each submission.
- Pay per subscription – subscriptions packages are great for agents. It allows them to pay once and submit an X number of properties. Once the X number of properties has been submitted, they can purchase the price package again and repeat the process.
Select Post Type
If you’re using the native “Property” post type, you need to check “Property” here. Price packages can also be created for custom post types; those created from Tevolution ⇨ Custom Post Types.
Select Categories
RE Directory allows you to create specific price packages for specific categories. If you create a price package for a specific category, that price package will not show (inside the Submit Propertypage) unless the correct category is selected. If you don’t need category-specific price packages, just select all categories inside this field and also check the “Show Package even when no category is selected” option.
Did you know you can set category prices? Just go to Properties ⇨ Property Categories and edit your category. Enter your price inside the “Category Price” field. Category prices will be added on top of the regular package price.
Billing Period
By setting the billing period you control how long will properties submitted using that price package be available on the site. If you set it to 1 month, the properties will be published for 1 month. You can use the billing period as a base for more expensive price packages. Your cheaper packages provide less active time while more expensive ones offer longer exposure.
Quick tip: You can control what happens with expired properties from Tevolution ⇨ General Settings ⇨ Submission page settings ⇨ Default status for expired listings
Is Recurring?
By creating a recurring package you give content authors the opportunity to automatically renew their submitted properties. The submitted property will be active the same amount of days as the billing period. At the end of the period the user will be automatically billed again and the property will be renewed. You can control the number of recurrences by editing the “Billing Cycle” field. If you want an endless cycle just enter a very big number here.
Note: Recurring payments only work with PayPal. The payments can be stopped by visiting the PayPal website. Detailed instructions are provided here.
Is Featured?
Featured properties are an additional way to make money in RE Directory as they give more variety to your price packages. Featured prices (available for homepage and category page) are optional prices added on top of the initial price package price (set with the “Amount” field). In other words, users can only feature a property if they purchase the price package.
Featured properties are styled differently compared to normal properties and are also grouped at the top of the page (homepage/category page). Furthermore, you can tweak the “Homepage Display Properties” widget to only show featured properties. Do that by choosing “Featured Listing” inside the “Sorting Options” option.
Quick recap: Ways to make money with price packages
- Charge more for price packages with longer billing periods.
- Add multiple subscription packages; set a higher price for those that allow users to submit more properties.
- Combine featured options with free packages. Free packages are great for site growth, but featured options still allow you to make money.
- Set category prices if you notice people submitting properties into unrelated categories (for more exposure).
- If its appropriate, set category-specific price packages.
Need even more variety? Consider purchasing our Fields Monetization add-on. It will allow you to assign specific custom fields to specific price packages (charge more money for more content) and also control the amount of text authors can enter into text fields.
Manage payment methods
Real Estate Directory comes with two available payment methods: PayPal and Pre Bank Transfer. You can manage both by going to Tevolution ⇨ Monetization ⇨ Payment Gateways ⇨ Manage Payment Options and clicking on the “Setting” link next to both methods. These payment methods integrate with the price packages functionality; it’s what the visitors will use to complete the payment.
- PayPal – online payment method. Users will need to have a PayPal account in order to complete a payment. Once the payment is completed the property is published instantly. All you need to do to configure PayPal is enter your PayPal email. This is the email you use to login to your PayPal account.
- Pre Bank Transfer – offline payment method. After selecting this method users will be instructed to make a payment directly to your bank account. Properties submitted using this method will be drafted (by default). You will need to publish them manually after checking your bank account and verifying that a payment was made. To configure this payment option just enter your bank account details. If you want to edit the Pre Bank message that appears after users select that option, go to Tevolution ⇨ Email Settings ⇨ Notification Content Settings and modify the “PreBank transfer success message”.
To add more payment options check out our selection of premium payment gateway add-ons.
Manage transactions
A transaction in RE Directory is essentially a purchase of one of your price packages. You can review all such purchases from Tevolution ⇨ Transactions. From that section you can filter transactions based on a variety of parameters and even export them to a CSV file.
Follow these three simple steps to confirm a (Pre Bank) payment

For more details about transactions please visit the Tevolution Guide
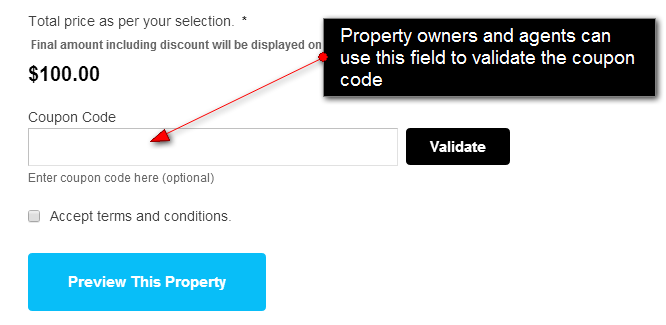
Create coupons
By creating coupons you can offer discounts on your own price packages. This is great when running promotions (like for Christmas or Black Friday). To create a coupon go to Tevolution ⇨ Monetization ⇨ Manage Coupons ⇨ Add a new coupon. Coupons can be limited to a specific time-frame by setting a start and end date. If you want the coupon to never expire, just enter an end date well into the future.
On the Submit Property page, the coupon code field will show automatically when a paid price package is selected.
Display banners and ads
Outside of monetizating the submission form, one way to make money in RE Directory is to showcase banners and ads. You can do that by adding images or advertisement codes inside widget areas. Use “Text” or “T – Advertisements” widgets to achieve that. Displaying an image is as simple as entering this HTML code (inside a Text widget)
<a href="YOUR_LINK" target="_blank"><img src="IMAGE_URL" alt="" /></a>
YOUR_LINK = where you want the visitor to go after clicking the image.
IMAGE_URL = direct URL to the image. You can upload images from Media ⇨ Add New. After the upload copy the value of the “File URL” field.
For more control over banners and additional areas in which to showcase ads, consider installing the Ad Manager premium add-on.
Advanced settings and features
The list below contains links to various features of the Tevolution plugin; one of the main components of your Real Estate Directory theme.
How to translate RE Directory?
RE Directory can be translated using Poedit software. The files you should be using for translating are located inside the /wp-content/themes/RealEstateDirectory/languages folder. Use the en_US.po file to translate the front-end strings and admin-en_US.po to translate the back-end strings. Those are “global” PO files and contain strings from each of the 4 RE Directory components. If you want, you can also translate each individual component by opening the “languages” folder inside each plugin (and the theme).
For detailed instructions on translating the PO file open the following article.
Quick tip: For displaying RE Directory in multiple languages you will need to purchase and install the WPML plugin.
Using property statuses (tags)
Property statuses are essentially tags displayed on top of properties (within the thumbnail area) on your homepage and category pages. The theme allows you to customize both the tag name and color. Here’s how tags look on our demo
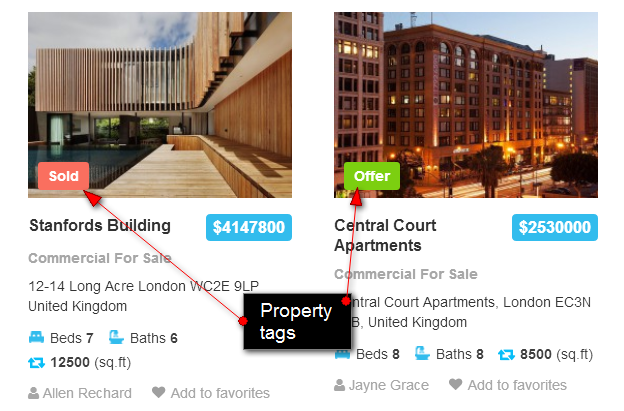
To edit existing tags navigate to Tevolution ⇨ Custom Fields Setup and modify the Property Status field. Change values within the “Option Title” and “Option Values” text boxes. Add new statuses by continuing the array, i.e. separate new values with commas.
The values you set within the Property Status custom field are the status names that will show inside areas like the Property Filters sidebar widget. To edit the name and color of the actual tag (like “Sold” and “Offer”) go to Tevolution ⇨ General Settings ⇨ Category page settings ⇨ Set the title and colors for property status tags.
Frequently Asked Questions
How to remove the “Select All” option when selecting categories on the “Submit Listing” page?
To remove that option just add the following snippet of code to Appearance ⇨ Custom CSS Editor
.category_label .cf_checkbox > label{
    text-indent:-9999px;
    height:0px;
}
.category_label .cf_checkbox ul label{
    text-indent: 0;
}
How to change square feet (sq ft) to meters (m)?
You can do this by translating the language file. Here’s is the full location to that file: /wp-content/themes/RealEstateDirectory/languages/en_US.po. Within that file translate the Sq Ft and sq.ft strings. For details on how to translate that file open our localization tutorial.
How to add custom fields to the homepage search widget?
You can do that by going to Tevolution ⇨ Custom Fields Setup ⇨ Add a custom field. To make a custom field show inside the homepage search section make sure to checkmark “Property Search Widget” inside the “Show the field in” option.
How to setup the “Range” field?
A “Range” field allows you to define a minimum and maximum value. On the submission form authors will only be available to enter values that are between that maximum and minimum. Within the search form visitors will be able to select a range value using a nifty slider.
To set this up go to Tevolution ⇨ Custom Fields Setup ⇨ Add a custom field and select “Range Type” under the “Type” option. Then, in “Show the field in” checkmark “Property Search Widget” and then under “Show on search as” select “Range Slider”. Enter your min and max values within the “Define your range” boxes.
How to configure SEO settings?
Real Estate Directory theme doesn’t come with SEO features built-in. Instead, we are providing full support for these two popular SEO plugins
How to hide the city selector?
If you want to use RE Directory with multiple cities, but don’t want to display the header city selector, just enter the following code to Appearance ⇨ Custom CSS Editor.
body .toggle_handler {
display: none;
}
#show_togglebox-button #show_togglebox_wrap {
display: none;
}
Can’t see changes made to custom fields?
By default the theme will cache custom fields. To disable caching go to Tevolution ⇨ Custom Fields Setup and click on the “Disable Cache” button at the top of the page.
Extend the functionality
Even though RE Directory comes with a crazy amount of features built-in, there are even more stuff you can add by purchasing premium add-ons. Some of the most popular add-ons at the moment include…
- Fields Monetization – add more variety to your price packages by controlling which fields show up for which price package.
- Events – enables a new post type inside your theme; events. Recurring events functionality is also available with this plugin.
- List Filter – add custom fields as new filters for the property category pages. Also works on search results pages.
- Tabs Manager – allows you to display existing or new custom fields as tabs on the property detail page.
- Category Icons – display a nice Front Awesome icon every time categories are listed. Works with category widgets and sub-categories within parent category pages.
For a complete list of available RE Directory add-ons open the following page.
↧
Migrate data from Realestate to Realestate Directory theme
Realestate Directory seems quite similar to Realestate at first glance but actually it is way different in terms of functions, features and most importantly way of handling the functions. So, you cannot have everything in Realestate Directory site that you had in your Realestate and neither you can run this theme on your Realestate site. You need an another site to use Realestate Directory theme.
The only thing that can be done is DATA migration. That is, with some steps as mentioned below, you can migrate your Realestate theme data to the Realestate Directory theme. The data migration includes the default post type “Property” in it.
1.Compare your .csv file
- First of all, export your Realestate data into a .csv file from wp-admin -> Realestate -> Advance settings -> Bulk Upload -> Export. Select your post type (i.e. Property) and export it to .csv file.
- Now, head over to your Realestate Directory website wp-admin -> Tevolution -> Bulk Import/Export -> CSV Import
- Download sample csv of the post type “property” to compare its column sequence and names with your exported csv data file from Realestate.
- Now open both the .csv files, comparing their columns arrange your Realestate .csv file’s columns according to the .csv file columns of Realestate Directory’s listings.
- Simply cut – paste the columns in your Realestate csv file according to the positions shown in the Realestate Directory’s sample csv file.
- If you are operating with single city or haven’t activated LocationManager plugin in your Realestate Directory site then under the column “post_city_id” leave fields blank and save your csv file before uploading.
Tip:
- For Windows users – To save time and confusion, you can use excel/csv functions. After opening both the csv files, click Windows -> Arrange -> Horizontally given in the menu bar to arrange your files in such a way that it helps you compare faster and accurate.
- For Mac users – It is best to work with OpenOffice when working with CSV files
But what if I have some more columns and custom fields?
As sequence matters, you cannot have them in the middle of columns shown in listings sample file, but you can add those fields/columns after the last column of the file “package_id“.
2. Remove columns
There are some columns which were there in Realestate’s csv file but is not there in Realestate Directory’s property listings csv file. But don’t worry you will not have any data loss on removing them from your csv file as some of them were WordPress default columns that are not needed in your Directory site. If you still think that you want to include any column then you can insert that column at the last i.e. after the column “package_id“
- “post_password”
- “post_date_gmt”
- “to_ping”
- “pinged”
- “menu_order”
- “post_modified_gmt”
- “post_content_filtered”
- “paid_amount”
- “contact”
- “email”
- “post_parent”
- “website”
- “language”
- “location”
- “property_city”
- “property_state”
- “property_country”
If you require below said columns then simply place it after the column “package_id” (i..e at the last) and if not then delete them.
- “remote_ip”
- “ip_status”
- “total_amount”
3. Change Column Names
Both the themes Realestate and Realestate Directory appears to be same but they aren’t. So, there are some difference in structure and format which you have to apply to your csv file in order to import it to Realestate Directory site.
Change field names
- “Post_author” to “templatic_post_author”
- “post_date” to “templatic_post_date”
- “post_title” to “templatic_post_title”
- “category” to “templatic_post_category”
- “IMAGE” to “templatic_post_img”
- “tags” to “templatic_post_tags”
- “post_content” to “templatic_post_content”
- “post_excerpt” to “templatic_post_excerpt”
- “post_status” to “templatic_post_status”
- “comment_status” to “templatic_comment_status”
- “ping_status” to “templatic_ping_status”
- “post_name” to “templatic_post_name”
- “post_type” to “templatic_post_type”
- “comment_count” to “templatic_comment_count”
- “comments_data” to “templatic_comments_data”
- “geo_address” to “address”
- “property_zip” to “zip_code”
What not to change?
If you have added some custom fields in your Realestate’s “Property” custom post type, it will also be exported along with all the other fields. So, there you do not have to add “templatic_” as its prefix in the column name but place those columns at the last after the column “package_id”.
4. Add additional columns
There are few columns which were not in Realestate’s .csv file but is there in Realestate Directory’s .csv file, so you need to add those columns in your .csv file of Realestate at the position shown in the property listing’s .csv file. Let’s see which are those columns and what you have to do
- Add “rentperiod” column between the columns “price” and “bedrooms” in your csv file.
- Add “loan_available” column after the “mls_no” column.
- Add “property_tag” column after the “loan_available” column.
- Add “video” column after the “property_tag” column.
- Add “post_tags” column after the “video” column.
- Add “ country_id” column after the “additional_features” column.
- Add “zones_id” column after the “country_id” column.
( For the above columns you can add the ids of country and zone (given in directory site at Tevolution -> Manage Locations) to which your post belongs.)
- Add “package_id” field at the last i.e after the featured_type column in your csv (revised) file.
For country id and zone id the same thing can also be done using admin back-end by editing your listing from there and selecting the country, state and city from given drop down. But, you should choose the option according to the total cities you are having. If you are dealing with few cities and countries or states then directly write their ids in csv as it will be simple for you to copy the same value for bunch of your listings.
How to get these ids?
It is quite simple,
- Just go to your Directory site at wp-admin -> Tevolution -> Manage Location
- There click on any of the links Country | State | Cities for which you require an id.
- Hover on the country/state/city name and you will find a URL kind of thing at the left bottom of your screen where the id will be at the last of the sentence.
- For example – Hovering on any state name, you will have location_manage_locations&locations_subtabs=state_manage_locations&country_id=195&zone_id=3095. where country id is 192 and state id i.e. zone id is 3095
5. Minor changes in the content
- In your Realestate’s .csv file, you must be having “&(ampersand)” as the separator between two category names in the column “post_category” so just replace it with “, (comma)” there to import it correctly in directory theme.
- For Example – You are having a listing that belongs to both the categories “Property” and “Restaurants” so in your Realestate csv, category column must be having values like ‘Property&Restaurants’ there you have to remove that “&” sign and put a ‘,’ i.e comma there.
- [templ_msg_box type="success"]CSV Tip: If you are not much aware of using excel or csv, let me tell you that you can replace it within a second. Just select the whole category column clicking on its top then find and replace “&” with “,” using ctrl + H.
- Then, in your column “map_view“, if you have “default view” as value for your maps then just change it and write any of these map view there “Road Map” or “Terrain Map” or “Satellite Map” or “Street map” as per your need.
In short, compare your Realestate .csv file with Realestate Directory’s .csv file and add/edit columns, their names, their values and their formats and modify your Realestate theme .csv file as per .csv file of Realestate Directory theme and then import it from wp-admin -> Tevolution -> Bulk Import/Export -> CSV Import.
It is mandatory to change some column names, their values and formats as said above to import your Realestate’s theme data accurately. Also, we have tested this bulk import feature only with last updated version of Realestate theme. So, we do not support uploading with the earlier version of Realestate theme.
6. How to upload image as well along with other data?
- Go to your active WordPress directory and create a folder named “bulk” at ../wp-content/uploads/
- OR if you are using multi site (network) on your WordPress then create the same folder “bulk” at ../wp-content/uploads/sites/”site_Id”/ (to know your site’s Id, simply head over to Network Admin -> Sites, locate your site name there and hover on edit link given below, you will be having an URL kind of sentence at the bottom left of your screen and the numeric value written after site-info.php?id= is your site Id (e.g. site-info.php?id= 48)).
- Move (or paste) your desired images in this “bulk” folder.
- Now, write the same names of those images along with their file extension (like .jpg or .png etc) in your csv file in the column name “templatic_img” (as written in sample csv) and save it.
- Then import your csv from wp-admin -> Tevolution -> Bulk Import/Export and you are done.
- You can check it at wp-admin -> Tevolution -> Directory (for post type listings).
↧
↧
WYSIWYG Submission
Installation
- Download the plugin from Templatic member area.
- Navigate to wp-admin ⇨ Plugins ⇨ Add New ⇨ Upload. Use the “Browse” button to load the previously downloaded .zip file. Click on “Install Now” to confirm.
- Once the plugin is finished installing click on the “Activate” button.
Setting up the plugin
By activating this plugin you have enabled a new page inside the wp-admin ⇨ Pages section. The page name is “WYSIWYG Listing Submission”. To start adding content just visit that page. To generate a new WYSIWYG submission page create a new page from Pages ⇨ Add New and insert this shortcode
[wysiwyg_submission_form post_type='listing']
If you’re using WYSIWYG Submission add-on with Real Estate Directory (or some other parent theme), insert “property” instead of “listing” inside the shortcode. Do the same if you want to generate a new submission page for your custom post type.
Custom Fields
The new WYSIWYG submission page is defined by custom fields available inside the Tevolution ⇨ Custom Fields Setup section. To edit a field label or default value, just open that specific field from the Custom Fields Setup section.
If you’re tweaking custom fields a lot I recommend temporarily disabling the Tevolution cache. You can do that from Tevolution ⇨ Custom Fields Setup (top of the page).
Managing submissions
Once a listing is submitted it will show in the wp-admin ⇨ Listings section of the back-end. The same is true for drafts. Once a visitor saves a draft he/she can later manage it from their user dashboard. You (as admin) can also manage that draft from the Listings area.
The plugin will also create automatic drafts while visitors are filling in content. These drafts are saved for 1 hour. You’ll recognize them by the “Submission In Progress” status in the back-end.
To control what happens with listings once they are submitted (are they drafted or published) navigate to Tevolution ⇨ General Settings ⇨ Submission page settings.
Frequently Asked Questions
How to translate the plugin?
You can translate the plugin by using the language file located inside the /languages folder. For instructions on handling PO and POT files open the following article
http://templatic.com/docs/how-to-localize-templatics-wordpress-themes/
↧
User filters for MailPoet
Installation
For setting the Mass Mailer plugin at your site you need to have 2 plugins installed and activated at your site, MailPoet plugin and Tevolution Mass Mailer plugin
- Download the Tevolution Mass Mailrer plugin from the Directory ⇨ Directory Extensions section of the Templatic member area.
- Navigate to wp-admin ⇨ Plugins ⇨ Add New ⇨ Upload. Use the “Browse” button to load the previously downloaded .zip file. Click on “Install Now” to confirm.
- Once the plugin is finished installing click on the “Activate” button.
- For installing the Mail Poet plugin go to wp-admin ⇨ Plugins ⇨ Add New ⇨ Search for ‘MailPoet’ plugin and form the list available select the MailPoet Newsletter plugin and install it. After installing the plugin you need to activate it at wp-admin ⇨ Plugins.
By activating this plugin you can now see a new menu item got added with name ‘MailPoet’ in your Dashboard at themes backend.
Setting up the plugin
With the plugin installed, head over to themes backend ⇨ MailPoet ⇨ NewsLetter ⇨ Create a new email . On the next page that arrives you can notice the below message,on the top of the page. It is necessary to add this codes in the given files.
Before you get started adding your newsletters we need you to add a few actions in MainPoet plugin files to create a bridge betweeen both the plugins, here are the details:
- Add this line of code:
$step = apply_filters('tevolution_mass_mailer_step',$step);in mailpoet file
File Name: plugins\wysija-newsletters\views\back\campaigns.php
Line No: 1110, just above this line of code:if (!isset($msg['browsermsg'])) { - Add this line of code:
do_action ( do_action('tevolution_mass_mailer_save_lists',$campaign_id,$email_id); )in mailpoet file
File Name: plugins\wysija-newsletters\controllers\back\campaigns.php
Line No: 1213, after given code:$this->_saveLists($campaign_id, true); - Add this line of code:
do_action (do_action('tevolution_mass_mailer_delete_newsletters',$campaign_id);in mailpoet file
File Name: plugins\wysija-newsletters\controllers\back\campaigns.php
Line No: 772, just below this line of code:$modelEmail->delete(array('campaign_id' => $campaign_id));
Using the Plugin
There are 2 types of NewsLetter
1. Standard Newsletter
2. Automatic Newsletter
The only difference between the above newsletter types is that with Automatic Newsletter you can sent scheduled emails i.e on Weekly,Montly or Immediately as per the options given
In the Subjectline Field you can specify the Subject of the Newsletter you want to sent.
There is a Send Email to Users select dropdown given to select to whom you want to sent this newsletter. ( i.e to which group of users ). 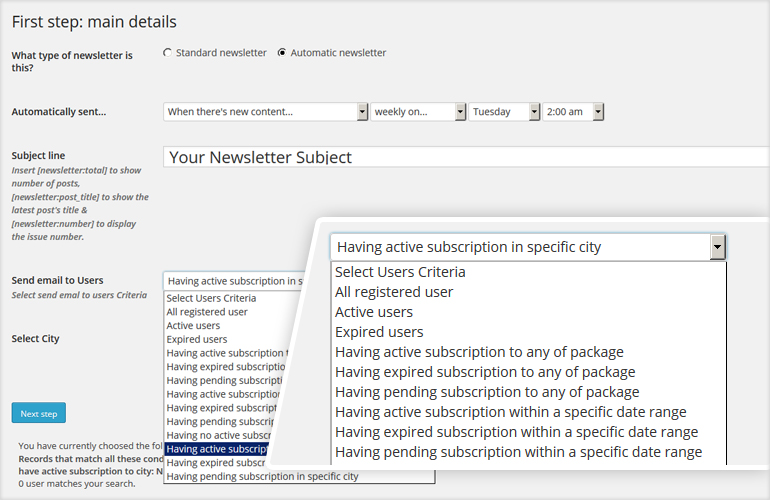 As shown in the screenshot above there are below options given this select dropdown
- All registered users – By selecting this you can sent the newsletter to all the registered users at your site.
- Active users – By selecting this you can sent the newsletter to all the active users ( users whose subscriptions are active ) at your site.
- Expired users – By selecting this you can sent the newsletter to all the expired users ( users whose subscriptions has been expired ) at your site.
- Having active subscription to any of the package – By selecting this you can sent the newsletter to users having active subscription to any of the Price package selected by the user at your site. (You can see the Price Packages option getting visible below the ‘Send Email to Users’ dropdown)
- Having expired subscription to any of the package – By selecting this you can sent the newsletter to users having expired subscription to any of the Price package selected by the user at your site.(You can see the Price Packages option getting visible below the ‘Send Email to Users’ dropdown)
- Having pending subscription to any of package – By selecting this you can sent the newsletter to users having pending subscription (i.e payment pending for the package selected ) to any of the Price package selected by the user at your site.(You can see the Price Packages option getting visible below the ‘Send Email to Users’ dropdown)
- Having active subscription within a specific date range – By selecting this you can sent the newsletter to users having active subscription within specific date range.(You can see the Start Date and End date datepickers along with the Price Packages option getting visible below the ‘Send Email to Users’ dropdown)
- Having expired subscription within a specific date range – By selecting this you can sent the newsletter to users having exired subscription within specific date range.(You can see the Start Date and End date datepickers along with the Price Packages option getting visible below the ‘Send Email to Users’ dropdown)
- Having pending subscription within a specific date range – By selecting this you can sent the newsletter to users having pending subscription within specific date range.(You can see the Start Date and End date datepickers along with the Price Packages option getting visible below the ‘Send Email to Users’ dropdown)
- Having no active subscription to any of – By selecting this you can sent the newsletter to users having no active subscription at all for any of the package you have on your site.
- Having active subscription in specific city – By selecting this you can sent the newsletter to users having active subscription for specific city.(You can see the Select City drop down getting visible below the ‘Send Email to Users’ dropdown)
- Having expired subscription in specific city – By selecting this you can sent the newsletter to users having expired subscription for specific city. (You can see the Select City drop down getting visible below the ‘Send Email to Users’ dropdown)
Below are the steps given to send Newsletter using the Mass Mailer plugin.
- Go to wp-admin ⇨ MailPoet ⇨ Newsletter ⇨ and click on Create a new email link.
- In the next page that opens select the type of Newsletter you want to send i.e either Standard or Automatic.
- In the Subjectline field specify the subject of the Newsletter mail you want to sent to your users.
- Now from the Send email to users dropdown select the relevant options ( as explained above ) to send the newsletter to the users.
- Now click the ‘Next Step’ button and in the next page that appears you can format the Newletter mail content by adding Titles,Images,Styles etc.
Frequently Asked Questions
How to translate the plugin?
You can translate the plugin by using the language file located inside the /languages folder. For instructions on handling PO and POT files open the following article
http://templatic.com/docs/how-to-localize-templatics-wordpress-themes/
↧
Listing Statistics
Installation
- Download the plugin from Templatic member area.
- Navigate to wp-admin ⇨ Plugins ⇨ Add New ⇨ Upload. Use the “Browse” button to load the previously downloaded .zip file. Click on “Install Now” to confirm.
- Once the plugin is finished installing click on the “Activate” button.
Setting up the plugin
On activating this plugin you are redirected to Monetization page at themes backend showing the Price Packages added. The reason you are taken to this page is that ,in every Price package that you have created there gets an option activated having label Allow listing statistics on author profile page in Price Setting part of the Price Package.
Selecting this option i.e checking the checkbox for particular Price Package will enable the Statistic feature for those listings added to the site choosing this particular price package. You can enable this option either for all the Price packages created or any number of the Price packages as per your choice.
Using the Plugin
- First install and activate the plugin at wp-admin ⇨ plugins ⇨. On activating you will be redirected to the Monetization page where you need to enable the Statistic feature for the added Price Packages as per your choice.
- After enabling the Statistic feature by checking the “Allow listing statistics on author profile page” in the Price package, this feature is available for all those Post types selected in this particular Price Package.
- After enabling this feature if suppose any listing ( may be Event or Listing or Property ) is added using the Price Package for which the Statistic feature is enabled , that listing on users profile page / dashboard page at themes front end will show a button named ‘Statistics’ along with the Edit,Upgrade and Delete buttons.
- Clicking this “Statistics” button will extend below to show the Statistic of this listing i.e How many times the Listing has been visited from Front page ( Home page ) and Category page and also number of times Inquiry/Friend Request has been sent for this listing along with number of users added this particular listing as Favorite as shown in screenshot below.It also shows the Statistics Month wise as well as Year wise.

Frequently Asked Questions
How to translate the plugin?
You can translate the plugin by using the language file located inside the /languages folder. For instructions on handling PO and POT files open the following article
http://templatic.com/docs/how-to-localize-templatics-wordpress-themes/
↧
Proximity Search
Installation
- Download the plugin from Templatic member area.
- Navigate to wp-admin ⇨ Plugins ⇨ Add New ⇨ Upload. Use the “Browse” button to load the previously downloaded .zip file. Click on “Install Now” to confirm.
- Once the plugin is finished installing click on the “Activate” button.
Setting up the plugin
By activating this plugin you can now make a search as per the Zipcode added to the Address in the listings or Zipcode added to custom field (if created by the user at themes backend ).The search result will show the distance between the location of the searched Zipcode and the City specified in the Address of the Listings added.
You can use this plugin with T – Search by address widget given in Directory and Directory based themes.
Using the Plugin
If you have added Zipcode to the Address custom field or any new custom field with name say Zipcode you can make a Search for those listings just by specifying the Zipcode in the Where? part of the T-Search by Address widget.
Suppose you have added a Zipcode to the address custom field say ’10011′ for the city New York. Any user browsing your site can now make a search just by specifying the Zipcode of the City or Place to which the listing has been added.
When you specify the Zip Code in the Where? field of the T – Search by Address widget for e.g ’10011′ , it will show all the listings added to ‘New York’ city in the search result. The search result will also show the distance ( in Km by default ) between the searched zipcode and the Address of the listings listed in the Searched result as shown in screenshot below.

Frequently Asked Questions
How to show the distance in Km instead of Miles in Search result?
For this go to file proximitysearch_filter.php located at plugins\Tevolution-ProximitySearch\ and in this file on line no 186 change the code from
$distance = number_format(($address_distance/1000),2); to $distance = number_format(($address_distance*0.00062137),2); Also change the value of $radius_type variable on lines 189 and 193 from ‘km’ to ‘mile’ and ‘kms’ to ‘miles’.
How to change the place holder “Where?” in T – Search by Address widget at front end?
Go to file widget.php located at plugins\Tevolution-Directory\google-maps\ and on line 348 find the below code .
Just change the value ‘Where?’ in this code _e('Where?',DIR_DOMAIN);.
How to change the distance mode from driving ( default ) to other modes?
For this go to file proximitysearch_filter.php located at plugins\Tevolution-ProximitySearch\ and on line 179 look for the code
$geocode = file_get_contents($http.'maps.googleapis.com/maps/api/distancematrix/json?origins='. and add the modes i.e either driving,walking or bycycling as shown below
$geocode = file_get_contents($http.'maps.googleapis.com/maps/api/distancematrix/json?mode=walking&origins='.
driving -(default) indicates standard driving directions using the road network.
walking – requests walking directions via pedestrian paths & sidewalks (where available).
bicycling – requests bicycling directions via bicycle paths & preferred streets (currently only available in the US and some Canadian cities).
For more info on the modes please refer the link https://developers.google.com/maps/documentation/distancematrix/#RequestParameters
How to translate the plugin?
You can translate the plugin by using the language file located inside the /languages folder. For instructions on handling PO and POT files open the following article
http://templatic.com/docs/how-to-localize-templatics-wordpress-themes/
↧
↧
Listing Badges
Installation
- Download the plugin from Templatic member area.
- Navigate to wp-admin ⇨ Plugins ⇨ Add New ⇨ Upload. Use the “Browse” button to load the previously downloaded .zip file. Click on “Install Now” to confirm.
- Once the plugin is finished installing click on the “Activate” button.
Setting up the plugin
Once you activate the plugin and go to edit any listing in your WordPress Dashboard you will see an new section on right sidebar named Directory – New Badge. From there you can set your badge title, badge color and the date on which the badge will be automatically removed.
This badge will appear on thumbnails of listings on all listing archive pages as shown in the screenshot below.
![]()
Frequently Asked Questions
How to translate the plugin?
You can translate the plugin by using the language file located inside the /languages folder. For instructions on handling PO and POT files open the following article
http://templatic.com/docs/how-to-localize-templatics-wordpress-themes/
↧
Reviews Manager
Installation
- Download the plugin from Templatic member area.
- Navigate to wp-admin ⇨ Plugins ⇨ Add New ⇨ Upload. Use the “Browse” button to load the previously downloaded .zip file. Click on “Install Now” to confirm.
- Once the plugin is finished installing click on the “Activate” button.
Setting up the plugin
Once the Review Manager add-on is installed, listing authors on your website will receive an email notification whenever a comment/review is posted for one of their listings. Along with details about the person who commented, the email will also contain a direct link to the listing where the comment can be managed.
Charge extra for review management
The user review management functionality enabled by the Reviews Manager add-on is tied to price packages. This means you can use the new functionality as leverage within your price packages. Price packages with the reviews management ability can be set at higher prices compared to those without it. Enabling the feature for a specific price package is as simple as clicking on a checkbox while creating the package.
Using the Plugin
Authors can modify comment settings
Installing the Review Manager plugin will enable a new tab inside the front-end user dashboard called “Comment Settings”. From that section your authors will have control over these settings…
Email the author whenever
- Anyone posts a review
- A review is held for moderation
Before a review appears
- Review must be manually approved
- Review author must have a previously approved review
Manage reviews on listing detail pages
.
With this add-on authors will be able to manage reviews directly on the listing detail page. The management options for each review include:
- Approve
- Delete
- Delete & Ban IP
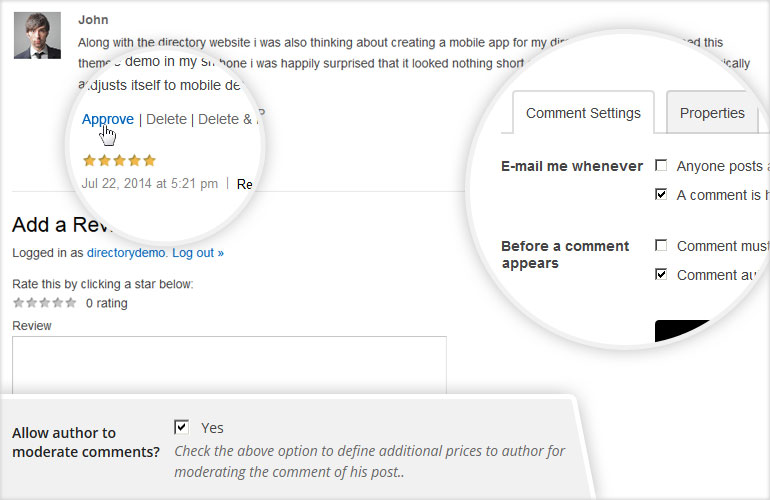
Frequently Asked Questions
How to translate the plugin?
You can translate the plugin by using the language file located inside the /languages folder. For instructions on handling PO and POT files open the following article
http://templatic.com/docs/how-to-localize-templatics-wordpress-themes/
↧
Real Estate
Installation
- Download the plugin from Templatic member area. You’ll find it inside the “Directory Extensions” sub-section.
- Navigate to wp-admin ⇨ Plugins ⇨ Add New ⇨ Upload. Use the “Browse” button to load the previously downloaded .zip file. Click on “Install Now” to confirm.
- Once the plugin is finished installing click on the “Activate” button.
Load sample data
As soon as you active the Real Estate add-on a new post type will be created on your site – Property. If you want to load a few sample properties to get you started more quickly just follow these steps:
- Download another copy of the Real Estate plugin from member area and extract it. Use software like WinRar, WinZip or 7Zip.
- Go to Tools ⇨ Import and click on WordPress. Proceed with the WordPress Importer installation. Once it’s done, click on the “Browse” button.
- Open the plugin folder you extracted in step 1 and load the property-dummy-data.xml file. It’s inside the root folder of the plugin.
Add a property
Add properties from the back-end
To add a property go to wp-admin ⇨ Properties ⇨ Add Property. Inside the “Add Property” screen that opens you should enter the property title, description and populate the fields listed under “Properties Information” section. You can control which fields show inside this area from Tevolution ⇨ Custom Fields Setup. For more details on that section open the Tevolution guide.
Below the “Property Information” area you should see available price packages. To create and manage your price packages navigate to Tevolution ⇨ Monetization.
For more information on property detail pages open the “Manage Pages ⇨ Detail page” section of this guide
Add properties from the front-end
Front-end submission is done using the “Submit Property” form. A page containing this form should have been created when you activated the plugin, you’ll find it from wp-admin ⇨ Pages. The URL of that page will be something like www.your-domain.com/submit-property. In case you deleted this page (or it was never created), go to Pages -> Add New, insert the below shortcode, set a title and publish the page:
[submit_form post_type='property']
Now that the page is created, both you (the admin) and your visitors can use it to submit content. Similar to the back-end submit section, most of the input fields available inside the form can be modified from the Tevolution ⇨ Custom Fields Setup section. You can also use that section to add new fields. To modify the “Select a package” section of the submission form, navigate to Tevolution ⇨ Monetization section.
How and where to moderate user submitted properties?
Once users submit properties, the will show up inside the Properties ⇨ Properties section. From there you can draft, publish or edit them. Another place from where you can manage them is Tevolution ⇨ Transactions. Use that section to bulk-confirm or bulk-deny transactions/listings.
To set the default status for submitted properties (publish/draft) head over to Tevolution ⇨ General Settings ⇨ Submission page settings ⇨ Default status for free/paid submissions
Manage pages
Property detail page
The property detail page is what you get after opening an individual property (created from Properties ⇨ Add Property). For more info on each element within that page check out the image below.
1 – Property title
This is the first bit of information you enter when creating properties from both the front-end and back-end.
2 – Property address
The information shown here corresponds with the value entered inside the “Address” field when submitting a property. The address field is available for editing from Tevolution ⇨ Custom Fields Setup section.
3 – Property price
The information shown here corresponds with the value entered inside the “Price” field when submitting a property.
Note: Enter whole numbers when defining prices. The plugin will add thousand and decimal separators automatically.
4 – Highlighted fields
Adding/editing fields in this area is possible only by customizing the plugin code. To edit that area use the following action and function
http://snippi.com/s/ie8ilhk
If you want to remove that whole section add this to Appearance ⇨ Custom CSS Editor
body.singular-property .entry-header-custom-wrap {
display: none;
}
5 – Send to friend form
This contact form allows visitors to quickly email a friend about the property (by sending the link). If you want to disable the form, do so from Tevolution ⇨ Email Settings ⇨ Enable additional forms.
6 – Claim ownership form
The main purpose of this feature is to allow visitors to claim listings on your site as their own. This is particularly useful in the early days of the site since you (the admin) will most likely add a lot of content yourself in order to make the directory appear bigger. The Claim Ownership feature will make it easier to transfer that listing to the rightful owner when he/she requests control over it.
Setting up/activating Claim Ownership
- Go to wp-admin ⇨ Tevolution ⇨ Overview and activate the Claim Post Manager module.
- Navigate to Tevolution ⇨ General Settings ⇨ Claim ownership settings and select the post types for which you want to enable Claim Ownership.
Quick note: The “Claim Ownership” button (inside a listing detail page) will not show to the listing owner. If you’re testing the functionality make sure you’re not logged in as admin.
Processing a claim
Once a visitor fills in the information requested by the Claim Ownership form the rest is up to you. Here are the steps…
- Go to wp-admin ⇨ Dashboard. Focus on the “Ownership Claims” widget. If you can’t see it, make sure the Claim Ownership module is enabled from Tevolution ⇨ Overview. You can also check the “Screen Options” button (top right corner) and see if it’s enabled there.
- Review the claim (click on the info icon) and choose the appropriate action by either confirming or deleting the claim
![]()
- If you confirm the claim, proceed with locating the new owners account. To do that, navigate to wp-admin ⇨ Users.
- Use the search function to look for a user with the email address mentioned inside the claim. If you get a hit, remember that username. If you don’t, add a new user by going to Users ⇨ Add New. Use the same email address that was mentioned inside the claim.
Important: While creating/editing the user set the role to “Contributor”.
- Assign the listing to a user by going to wp-admin ⇨ Listings. Click on the “Quick Edit” button that appears while hovering over listings and edit the “Author” dropdown. Screenshot.
- Optional: Go back to the Users section and set the role back to “Subscriber”. To learn more about the differences between each role open this codex entry.
7 – Send Inquiry form
This form allows visitors to get in touch with the property owner, i.e. the person who submitted the property to the site. The same thing can be achieved by using the contact widget displayed at the top of the sidebar.
The send inquiry form can be disabled from Tevolution ⇨ Email Settings ⇨ Enable additional forms.
8 – Add to favorites button
The favorites button allows website visitors to save specific properties for later viewing. Once saved (favorited), the property will become available inside the visitors front-end profile, under the “My Favorites” tab. Screenshot.
9 – Property detail page sidebar
To edit this area go to Appearance ⇨ Widgets and place widgets inside the “Property Detail Page Sidebar” area. The widgets used inside the image above are:
- T – Property’s Agents Details
- T – In The Neighborhood
- T – Finance Calculator
- T – Advertisements
- T – Browse by Categories
10 – Property images
Here displayed are the images assigned to the property while submitting it. Images can be added (from the back-end) by using the “Image Gallery” section inside the right sidebar. Please note that you need to upload new images in order to add them to the gallery.
11 – Features tab
The contents of the “Features” tab match up with the information added to the “Additional features” custom field while submitting a property. The field can be modified or disabled from Tevolution ⇨ Custom Fields Setup.
Quick note: To add other custom fields as tabs check out the Tabs Manager add-on.
12 – Map tab
The map tab shows a map of the location entered inside the “Address” field. The directions should be displayed inside the same language as your browser. Default language is English.
13 – Video tab
This tab will display a video under condition that the “Video” field is not empty. To edit/remove the tab, just edit the “Video” field inside Tevolution ⇨ Custom Fields Setup.
14 – Property information section
This is the main area in which the values assigned to your custom fields are displayed. The area will display both old (pre-loaded) fields and the new ones that you created. To edit field labels or even remove whole fields, use the Tevolution ⇨ Custom Fields Setup section.
Quick note: To hide a value from the detail page (but still keep the field active) uncheck the “Detail page” option inside the “Show the field in” area.
15 – The content
This is the primary description (content area) of your property. Feel free to use HTML and CSS to style the text. There are even plugins that allow you to execute PHP.
16 – Social sharing buttons
Website visitors will be able to use these buttons to share properties on Facebook, Twitter and other networks. You can enable/disable individual options from Tevolution ⇨ General Settings ⇨ Detail page settings ⇨ Show sharing options for.
17 – View counters
View counters show how many times that page has been opened today and all time. They can be disabled from Tevolution ⇨ General Settings ⇨ Detail page settings ⇨ Show view counter
18 – Next/Previous property buttons
These buttons allow visitors to quickly navigate to the next property within the same category as the one being displayed. If you don’t need these, hide them by adding the following code to Appearance ⇨ Custom CSS Editor.
.singular .pos_navigation {
margin-bottom: 0px !important;
visibility: hidden;
}
19 – Related properties
This section shows properties from the same category (or tag) as the one currently displayed. For editing related properties settings navigate to Tevolution ⇨ General Settings ⇨ Detail page settings. First 4 options within that section are dedicated to “related properties” section.
To edit that section of the plugin use the following action and function
http://snippi.com/s/qqnsdl9
Agent profile/dashboard page
This is the page that opens when you visit your own profile within the theme. Each users profile page can be accessed from a URL like this one: your-domain.com/author/the_username. Another way to access it is by clicking on your username inside the top navigation bar.
From the dashboard page all website users can manage their submitted properties, favorites and of course their own profile. The best part of the dashboard page is that you can control exactly which info appears there. Go to Tevolution ⇨ Profile Fields Setup to edit existing profile fields or add new ones.
Note: When creating a new profile field make sure to check-mark “User dashboard page” within the “Show the field in” option. If you don’t, the value won’t show inside the user dashboard page.
How to edit my profile?
Each user can edit their profile from this URL: your-domain.com/profile. A link to this page is also provided underneath the avatar inside the author/dashboard page. To modify the profile page, go to Pages ⇨ Add New and edit the “Profile” page. The profile page is a regular WordPress page with a shortcode that generates the profile fields. This allows you to easily add new content inside the page (above or below the profile fields) or to change its title or slug.
If you accidentally deleted the profile page, re-create it by following these steps:
- Go to Pages ⇨ Add New and create a new page. Enter whichever title you want.
- Insert the following shortcode as the content for that page
[tevolution_profile]
- Go to Tevolution ⇨ General Settings ⇨ Registration options and choose the page you just created within the dropdown for the “Profile Page” option.
How to edit profiles from other users?
As the admin, you can edit profiles from all members by going to the wp-admin ⇨ Users section.
How to create an “Agents” page as seen on the demo?
This is the page in question. It has been automatically created when you installed the theme. You’ll find it inside the wp-admin ⇨ Pages section.
If you accidentally deleted the agents page, re-create it by following these steps:
- Go to Pages ⇨ Add New and create a new page. Enter whichever title you want.
- Insert the following shortcode as the content for that page
[tevolution_author_list role='subscriber' users_per_page='8'][/tevolution_author_list]
Advanced settings and features
dsIDXpress integration
Using property statuses (tags)
Property statuses are essentially tags displayed on top of properties (within the thumbnail area) on your homepage and category pages. The theme allows you to customize both the tag name and color. Here’s how tags look on our demo
To edit existing tags navigate to Tevolution ⇨ Custom Fields Setup and modify the Property Status field. Change values within the “Option Title” and “Option Values” text boxes. Add new statuses by continuing the array, i.e. separate new values with commas.
The values you set within the Property Status custom field are the status names that will show inside areas like the Property Filters sidebar widget. To edit the name and color of the actual tag (like “Sold” and “Offer”) go to Tevolution ⇨ General Settings ⇨ Category page settings ⇨ Set the title and colors for property status tags.
Frequently Asked Questions
How to translate the plugin?
You can translate the plugin by using the language file located inside the /languages folder. For instructions on handling PO and POT files open the following article
http://templatic.com/docs/how-to-localize-templatics-wordpress-themes/
How to change square feet (sq ft) to meters (m)?
You can do this by translating the language file. Here’s is the full location to that file: /wp-content/plugins/Directory-RealEstate/languages/en_US.po. Within that file translate the Sq Ft and sq.ft strings. For details on how to translate that file open our localization tutorial.
How to add custom fields to the homepage search widget?
You can do that by going to Tevolution ⇨ Custom Fields Setup ⇨ Add a custom field. To make a custom field show inside the homepage search section make sure to checkmark “Property Search Widget” inside the “Show the field in” option.
How to setup the “Range” field?
A “Range” field allows you to define a minimum and maximum value. On the submission form authors will only be available to enter values that are between that maximum and minimum. Within the search form visitors will be able to select a range value using a nifty slider.
To set this up go to Tevolution ⇨ Custom Fields Setup ⇨ Add a custom field and select “Range Type” under the “Type” option. Then, in “Show the field in” checkmark “Property Search Widget” and then under “Show on search as” select “Range Slider”. Enter your min and max values within the “Define your range” boxes.
Can’t see changes made to custom fields?
By default the theme will cache custom fields. To disable caching go to Tevolution ⇨ Custom Fields Setup and click on the “Disable Cache” button at the top of the page.
↧
Customizing the Directory theme
With Directory updates being released relatively frequently (every few weeks) it’s becoming increasingly important to make your tweaks update-resistant. By that I mean customizing a theme in a way that allows you to update all components without painstakingly merging your customizations with changes that normally come with a new theme version.
How can you achieve this?
Tweaking CSS
Available from the Appearance ⇨ Custom CSS Editor section, the CSS editor allows you to quickly overwrite any CSS class used by Directory. Along with that, the section also allows you to create new classes… ones that you can then utilize when writing (new) PHP code. Possibly the best part about the Custom CSS Editor is that it saves all content inside the database, allowing you to update the theme without worrying about backing up any files (assuming that’s all you’ve changed).
Note: In order to work, the CSS Editor must first be enabled from the Appearance ⇨ Theme Settings section.
How do I know which class to change?
Awesome thing about CSS (and javascript) is that it’s executed within the browser and not on the server (like PHP). Since it’s executed by the browser you can see every CSS file and every CSS property executing on the page. To access the info you’ll need to utilize your browsers Developer Tools.
Assuming you’re using either Google Chrome or Mozilla Firefox, open the page you want to customize and right-click on the element that you want to change. Choose “Inspect Element” in the context menu. You should now see HTML on the left and CSS (for the selected HTML element) on the right. Tweak the CSS class shown on the right by editing its properties (or adding new ones). The changes you make are reflected on the page in real-time.

Once you’ve made the desired changes copy the CSS class and its properties and paste it into the Custom CSS Editor. They should be immediately reflected on the actual site. If they aren’t, try clearing your browse cache (or use Incognito/Private browsing mode). For additional details on how these things work open our Custom CSS tutorial. It even contains a short video.
Quick Tip: If you’re new to HTML & CSS I highly recommend completing the web course over at Codeacademy. It is truly awesome.
CSS example: Show price packages as a grid
To demonstrate just what kind of changes you can make with simple CSS, add the following code to your Custom CSS Editor
.package{
    float: left;
    margin-right: 20px;
}
.package label{
    height: 310px;
    width: 365px;
}
Now visit your listing submission page. The change should be pretty obvious…
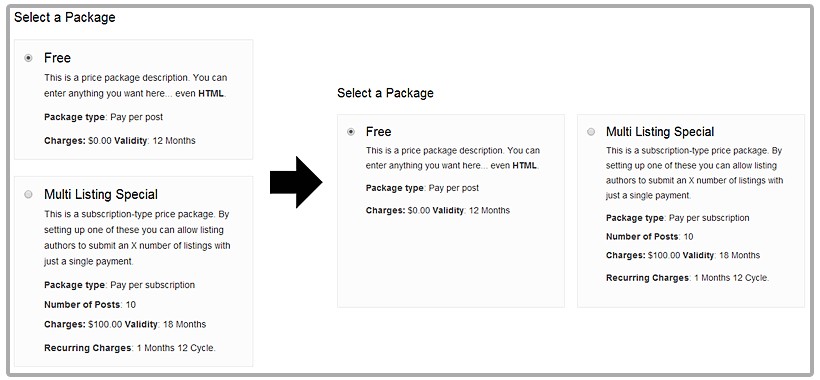
Tweaking PHP
Before I start explaining how to customize PHP code in Directory I should mention that this article is aimed at people who are already experienced with customizing PHP code. Since PHP isn’t something that can be learned with one simple tutorial you will need to learn more about it elsewhere. My advice is to take the Codeacademy PHP course, it’s brilliant.
Creating a plugin for your custom functions
Unlike some of the stuff we’ll tackle later on, creating a new plugin is actually dead-simple. To do it just follow these steps…
- Create a new folder somewhere on your computer (desktop is fine). Set the folder name to my-functions.
- Open a text editor (I recommend Notepad++) and create a new file (CTRL + N). Add the following code inside the newly created file:
<?php
/*
Plugin Name: My Functions
*/

?>
- Save that file inside the folder you previously created (my-functions) and set the file name as my-functions.php.
- Now connect to your server with FTP and navigate to /wp-content/plugins. Drag the “my-functions” folder from your computer (desktop) and into the /plugins folder.
- Connect to your WordPress dashboard and navigate to the Plugins section. The plugin we just created should already be showing. Now just activate it and we’re ready to go.
Now you’re probably wondering: Why do I need a plugin? The plugin will allow us to overwrite chunks of Directory code without actually touching the theme (or plugins). This will be achieved with hooks.
Code Snippets plugin – a good alternative
Code Snippets is a really good WordPress plugin that you can download for free from the plugins directory. It allows you insert snippets of PHP code within your WordPress site. This allows them to be much more organized… it also makes it easy to quickly disable specific tweaks. The biggest downside is that it doesn’t allow you to customize function-less files.
Introduction to hooks
Hooks are one of the building blocks of WordPress and something that can be a bit tricky to figure out. At first they might seem unnecessary, but you will very quickly start seeing their benefits. They come in two types: Actions and Filters.
Action hooks are kind of like placeholders that you can use to append (i.e. “hook”) additional content. This “additional content” can be added by the theme or any active plugin. The most popular of these action hooks is wp_head(). You’ll find that hook inside the header file (within the <head> tag) of any WordPress theme. What wp_head() does is allow you to easily append code inside the header. Remember those Google Analytics options most themes have? Well, the code you enter there is most likely being appended to wp_head().
Filter hooks are functions in WordPress used to intercept and manipulate data. Imagine you want to add a disclaimer at the end of each of your posts. Yes, you can edit each post and paste the paragraph, however wouldn’t it be better if you could add a piece of code that does that for you? By using hooks you can grab each posts content and modify it to display your disclaimer.
This hooks introduction was as brief as it gets. For more details on hooks I highly recommend reading this comprehensive WPCandy hooks tutorial.
Using hooks to customize Directory
Most of your customizations in Directory will be done using action hooks. Even though action hooks are normally used to append additional code at a certain point of the theme, they are also useful for overwriting a whole function. What you’ll do is copy the contents of the function (the one you want to change) inside the my-functions.php file and give the function a new name. You’ll then make the action use your own function instead of the one already associated with the action. You are essentially telling WordPress “Hey, this function is not really working for me… he’s a better one”. I’ll try to make this a bit clearer with examples…
How do I know which hook to focus on?
Possibly the trickiest part when customizing is figuring out where to actually make the change. These steps are identical whether you’re looking to change the theme file directly (not recommended) or make the change via a plugin. Here’s roughly what you need to do:
- Download a new copy of the theme and all plugins to your hard drive and extract it.
- Open the page/area you want to change inside your browser. Use developer tools to see the name of the DIV wrapping that section.
- Use Agent Ransack to locate the theme file in which that DIV is present. Open that file.
- Note down the function in which your code (DIV) is located.
- Use Agent Ransack again and search for that function name. Use it to locate the name of the action (hook) that’s loading the function.
To help you track down the file in charge of the code you’re tweaking I also recommend checking out the What The File plugin.
Good news is that often both the function and the action hook will be located right next to each other. The code will look something like this…
add_action('example_action', 'original_function');
function original_function() {
THE CODE
}
How to overwrite the action?
As mention earlier, we overwrite the code by disabling the current action and creating a new one; one that’s associated with our new function. This new code should be added to the My Functions plugin. Here’s how it should look:
remove_action('example_action', 'original_function');
add_action('example_action', 'customized_function');
function customized_function() {
MY CUSTOMIZED CODE
}
So, whenever the example_action is called inside the code (with do_action() ) it will no longer load the original_function(), instead it will load your customized_function().
What to do when the file you’re customizing doesn’t have a function to hook into?
Some files within the Directory theme are written without any functions for you to hook into. An example of this would be the Send Inquiry form (popup_inquiry_frm.php). Customizing those types of files is done by hooking into the function that loads the file. The process goes something like this:
- Locate the file you want to change. Copy the whole file inside your plugin (My Functions) and do your tweaks.
- Enter the file name as the keyword in Agent Ransack. You want to see which function is loading the file you just customized.
- Copy the function and action (that’s loading the file) inside my-functions.php
- Remove the original action and create a new function (as explained earlier). Customize the function so that it loads the customized file from your plugin and not the one located inside the theme.
Use the following code to reference your own plugin when entering a new path
plugin_dir_path( __FILE__ );
Code example
$pluginpath = plugin_dir_path( __FILE__ );
include_once($pluginpath."your-file-name.php");
What to do if the area you want to customize isn’t hookable?
Most of the times you will be able to customize the theme using the tips provided inside this article. However, if the area you’re customizing just cannot be customized remotely please contact us and let us know. The developers will try to include a hook inside the next version of the theme.
Report missing hooks in this forum thread.
Examples
Action hook example: Hide category grandchildren on category pages
Let’s say you want the categories at the top (of category pages) only showing immediate children of the current (parent) category; not their granchildren as well.
The code for this part of the theme is located inside /plugins/Tevolution-Directory/functions/directory_listing_functions.php. The function and action making this work are:
add_action('directory_subcategory','directory_subcategory');
function directory_subcategory(){
	global $wpdb,$wp_query;
	$term_id = $wp_query->get_queried_object_id();
	$taxonomy_name = $wp_query->queried_object->taxonomy;
	do_action('tevolution_category_query');
	$featured_catlist_list =  wp_list_categories('title_li=&child_of=' . $term_id .'&echo=0&taxonomy='.$taxonomy_name.'&show_count=0&hide_empty=1&pad_counts=0&show_option_none=&orderby=name&order=ASC');
	if(is_plugin_active('Tevolution-LocationManager/location-manager.php'))
	{
		remove_filter( 'terms_clauses','locationwise_change_category_query',10,3 );
	}

	if(!strstr(@$featured_catlist_list,'No categories') && !empty($featured_catlist_list))
	{
		echo '<div id="sub_listing_categories">';
		echo '<ul>';
		echo $featured_catlist_list;
		echo '</ul>';
		echo '</div>';
	}
}
To customize this function we need to add the following code inside my-functions.php
remove_action('directory_subcategory','directory_subcategory');
add_action('directory_subcategory','my_directory_subcategory');
function my_directory_subcategory(){
	global $wpdb,$wp_query;
	$term_id = $wp_query->get_queried_object_id();
	$taxonomy_name = $wp_query->queried_object->taxonomy;
	do_action('tevolution_category_query');
	$featured_catlist_list =  wp_list_categories('title_li=&child_of=' . $term_id .'&echo=0&taxonomy='.$taxonomy_name.'&show_count=0&hide_empty=1&pad_counts=0&show_option_none=&orderby=name&order=ASC&depth=1');
	if(is_plugin_active('Tevolution-LocationManager/location-manager.php'))
	{
		remove_filter( 'terms_clauses','locationwise_change_category_query',10,3 );
	}

	if(!strstr(@$featured_catlist_list,'No categories') && !empty($featured_catlist_list))
	{
		echo '<div id="sub_listing_categories">';
		echo '<ul>';
		echo $featured_catlist_list;
		echo '</ul>';
		echo '</div>';
	}
}
The only change we made was adding the depth parameter to the wp_list_categories() function. This is enough to prevent the granchildren from showing up in category lists.
Filter hook example: Edit the default map location on the Submit Listing page
If you have the Location Manager plugin enabled this little map should display your city location. If that plugin is deactivated on your site, the map should display New York. Let’s say you want to change this… the code controlling the location of the map is located inside /plugins/Tevolution/tmplconnector/monetize/templatic-custom_fields/location_add_map.php around line 29. These are the lines.
var CITY_MAP_CENTER_LAT = '<?php echo apply_filters('tmpl_mapcenter_lat',40.714623); ?>';
var CITY_MAP_CENTER_LNG = '<?php echo apply_filters('tmpl_mapcenter_lang',-74.006605);?>';
You can see we’re working with filters by the use of the apply_filters() function. To overwrite these values using our own plugin we need to insert this code
add_filter('tmpl_mapcenter_lat', 'my_custom_latitude',99);
function my_custom_latitude( $var ) {
return '51.511214';
}

add_filter('tmpl_mapcenter_lang', 'my_custom_longitude',99);
function my_custom_longitude( $var ) {
return '-0.119824';
}
What we did here is assign custom functions (my_custom_longitude and my_custom_latitude) to the matching filter hooks. The values we set will focus the small map onto London, UK. An important thing you need to remember here is that filter hooks always need to return a value!
Note: That number in the end (99) is the priority. It allows you to overwrite other functions that might be assigned to the same filter hook. The priority paramenter is also available for action hooks.
A list of Directory hooks
Frequently Asked Questions
Can I use a child theme to customize Directory?
Yes, you can. The main reason why I didn’t use a child theme for my customization explanations is because a number of Directory owners already use (our own) child themes. It’s not possible to create child themes of child themes. So, if you already have a child theme installed (like City Guide or Locations), you must customize PHP code using a plugin. Creating a child theme for holding your customizations is a good idea if you like the parent theme and don’t plan on using the child themes that we provide.
How to create a child theme? This process has been explained in numerous articles over the web so I’m not going to do it here. Check out this ManageWP article to get started.
Using pluggable functions
The use of pluggable functions is the biggest benefit of using a child theme compared to a plugin. Even though a number of functions inside Directory aren’t pluggable, you’ll be able to find a few that are. Spotting a pluggable function is easy….
Regular functions are declared like this
function example() {
THE CODE
}
Pluggable functions are declared like this
if(!function_exists('example')) {
    function example() {
		THE CODE
    }
}
One big difference between a child theme and a regular plugin is that the child theme executes before the parent theme. This allows you to easily redeclare functions within the child theme without worrying you’ll mess something up in the parent theme. If I wanted to redeclare the example() function all I have to do is add this to the child theme.
function example() {
My TOTALLY NEW CODE
}
Make sure you only use this method with pluggable functions, otherwise expect to see blank page when you try to visit your site.
↧
↧
PayPal Express Checkout
PayPal Express Checkout add-on works on the base of Tevolution plugin. So, it should be activated on your site to use it. Here few pre-conditions are mentioned without which you will not be able to use it. Then after, chronological steps are given with which you can install and activate this plugin. Along with that, we would like to suggest you to check for its operational countries too because if it does not operate in your country then you won’t be able to use it.
Pre Conditions
To use this payment gateway, you should
- Visit skrill.com
- Read their policies
- Sign up for a business account with them (If you already have merchants account, start installing the plugin)
Note: Also check do they support your business model?
Install and Activate
Here is how you can install and configure Skrill gateway using Tevolution Skrill plugin:
- Download Tevolution Skrill plugin from your members area to your desktop. (Tevolution plugin must be activated on your site. If you don’t have it also download Tevolution plugin zip file along with)
- Now, Go to WP-admin → Plugins → Add New → Upload.
- Browse the plugin zip file and click on “Install Now” button.
- You can also upload it in to your “wp-content/plugins” folder to your server directly using FTP.
- Once, uploaded go to WP-admin → Plugins and activate the plugin.
Note: If you are using Tevolution for the first time, it will ask you for the licence key. You can find it from your members area located under “your Subscriptions”.
How to setup

- Go to wp-admin -> Tevolution -> Overview and activate “Monetization” module
- Now, go to monetization section from wp-admin -> Tevolution -> Monetization.
- Switch to Payment Gateways tab and find Skrill from payment method list and activate it.
- Now, Click on Settings link below the payment method name.
- Mention all the necessary details in that form and click Save changes
- You will find the Skrill payment option in preview page under Select Payment Method section.
Queries? Tell us at Forums and we’ll help you out.
↧
Dwolla
Dwolla payment gateway add-on works on the base of Tevolution plugin. So, it should be activated on your site to use it. Here few pre-conditions are mentioned without which you will not be able to use it. Then after, chronological steps are given with which you can install and activate this plugin. Along with that, we would like to suggest you to check for its operational countries too because if it does not operate in your country then you won’t be able to use it.
Pre Conditions
To use this payment gateway, you should
- Visit skrill.com
- Read their policies
- Sign up for a business account with them (If you already have merchants account, start installing the plugin)
Note: Also check do they support your business model?
Install and Activate
Here is how you can install and configure Skrill gateway using Tevolution Skrill plugin:
- Download Tevolution Skrill plugin from your members area to your desktop. (Tevolution plugin must be activated on your site. If you don’t have it also download Tevolution plugin zip file along with)
- Now, Go to WP-admin → Plugins → Add New → Upload.
- Browse the plugin zip file and click on “Install Now” button.
- You can also upload it in to your “wp-content/plugins” folder to your server directly using FTP.
- Once, uploaded go to WP-admin → Plugins and activate the plugin.
Note: If you are using Tevolution for the first time, it will ask you for the licence key. You can find it from your members area located under “your Subscriptions”.
How to setup
- Go to wp-admin -> Tevolution -> Overview and activate “Monetization” module
- Now, go to monetization section from wp-admin -> Tevolution -> Monetization.
- Switch to Payment Gateways tab and find Skrill from payment method list and activate it.
- Now, Click on Settings link below the payment method name.
- Mention all the necessary details in that form and click Save changes
- You will find the Skrill payment option in preview page under Select Payment Method section.
Queries? Tell us at Forums and we’ll help you out.
↧
SpotFinder
Important
Since SpotFinder is a Directory child theme, all functionality is provided by the parent theme. Once you install SpotFinder (using instructions provided below) please open the Directory theme guide. That is the place where you’ll find instructions on how to setup your site.
Theme Installation
Installing Directory
Because the SpotFinder child theme is powered by Directory, you will have to install Directory in order to use the child theme. For Directory installation instructions watch the video below.
Quick note: The video will instruct you to activate Directory as the last step of installation process. Feel free to skip that part (just install Directory, don’t activate it).
The video didn’t help? Visit the Directory theme guide for more installation details.
Installing SpotFinder
With Directory installed you’re ready to move onto the SpotFinder child theme. Follow these steps to load the child theme and complete the installation process
- Login to Templatic member area and download the SpotFinder child theme. You’ll find it inside the Directory Downloads ⇨ Directory Child Themes section. Click on the section to reveal the download links.
- Open your WordPress dashboard and navigate to Appearance ⇨ Themes ⇨ Add Themes ⇨ Upload. Load the .zip file you downloaded a few moments ago.
- Activate the theme once the installation process is done.
- Click on the Insert Sample Data button to quickly populate your site with relevant content. We highly recommend doing this as it makes getting to know the theme much easier.
Frequently Asked Questions specific to SpotFinder
How to setup SpotFinder so it looks like the demo site?
The quickest way to do this is to load the sample data from Appearance ⇨ Themes. Click on the big blue Insert sample data button to load the sample content. The content added to your site consists not only of listings, post and pages, but also widgets. Once you click on that sample data button your homepage should transform into one that looks very close to our demo.
How to change the big map on category pages to something else?
You can do that by going to Appearance ⇨ Widgets and adding widgets to the “All Pages – Left Content” area. To remove the map, just remove the “Category Page Map” widget that’s available there by default. However, we have only designed map for this widget area so if you place any other widget the design will not come up properly.
Note: Widgets placed in this area will appear in category pages of all available post types (listings, properties, events, etc).
What is the perfect size for the logo?
The default logo size is 149×26 pixels. Ideally, that’s the size you should use for your own logo as well. However… the theme will work with smaller/larger logos as well.
How to set a custom background?
The background in SpotFinder can be changed from the Appearance ⇨ Customize section. When you open the section, expand the Background Settings area, click on No Image and then on the select a file link. Locate an image on your hard drive and upload it. Once the upload is done tweak the available options (repeat, position, etc) and hit the Save & Publish button at the top.
Quick Tip: Use FullHD images (width = 1920px) for the background image. An image of that size should look good on the majority of screen sizes.
Why aren’t colors in my theme showing up as they do on the demo?
Theme activation process can mess up the colors a bit on certain servers (we’re not sure why). If your theme colors don’t look normal (for example, the header is purple instead of white) follow these steps to fix the issue
- Connect to your server via FTP
- Navigate to /wp-content/themes/Directory/library/css and open the admin_style.css file
- Delete all contents of that file
- Save the progress and upload the file
If that doesn’t help please submit a thread inside the forums, we’ll take a closer look.
↧